DIY: Halloween Lightpost Decor

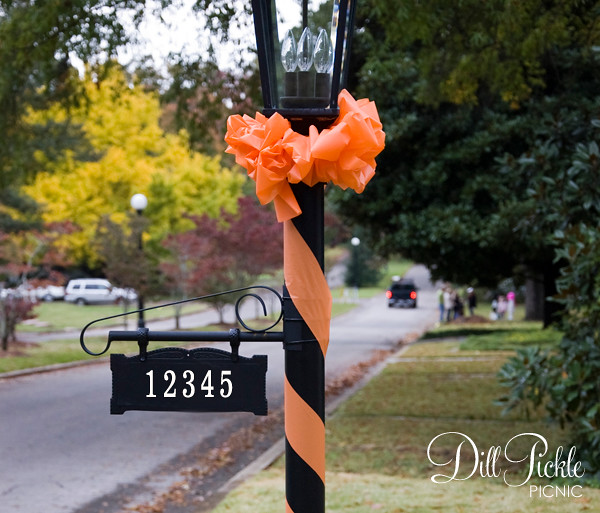
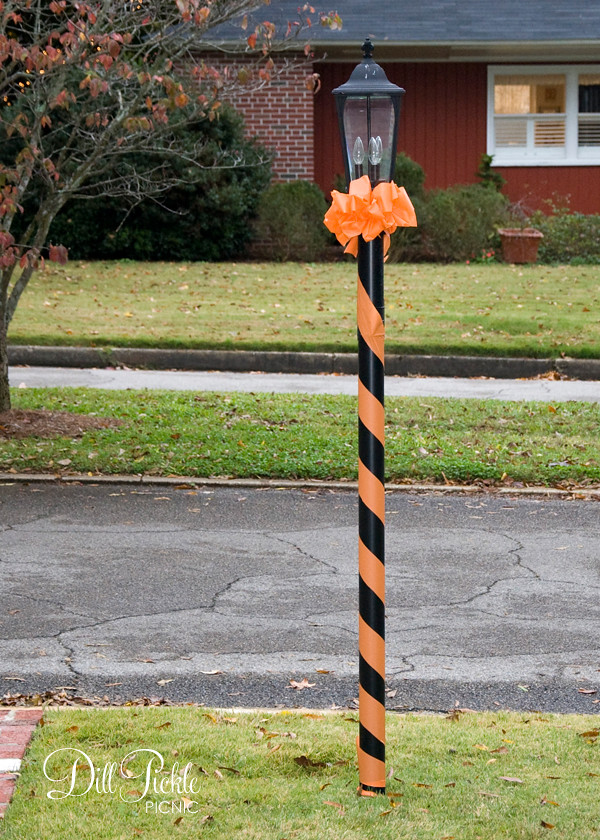
I had almost forgotten about posting this little quick project. Last Halloween my FIL hosted a bit of a Halloween party in his “under renovation” home. The “under renovation” part meant we didn’t even start decorating until a few hours before everything was to start. I learned it’s amazing what you can throw together really quickly…including this fun addition to his street number light post that cost less than $1 to make.

DPP-hallowpost1

Supplies Needed:

DPP-hallowpost3

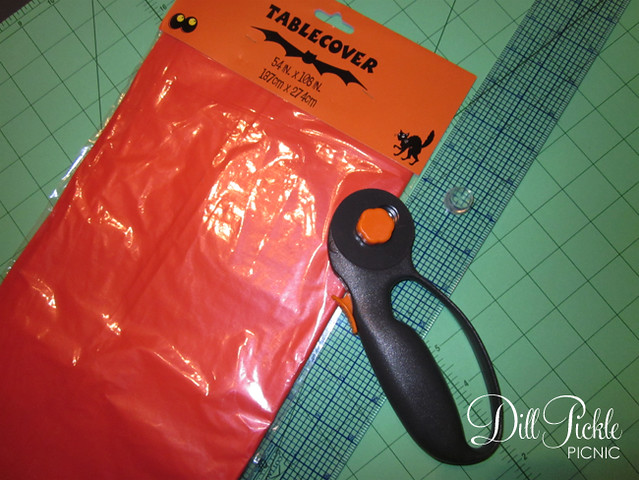
  • Plastic Table Covering (from your local dollar store)
  • Scissors or Rotary Cutter & Mat
  • Tape (I used painters tape, but scotch would work as well)

Instructions:

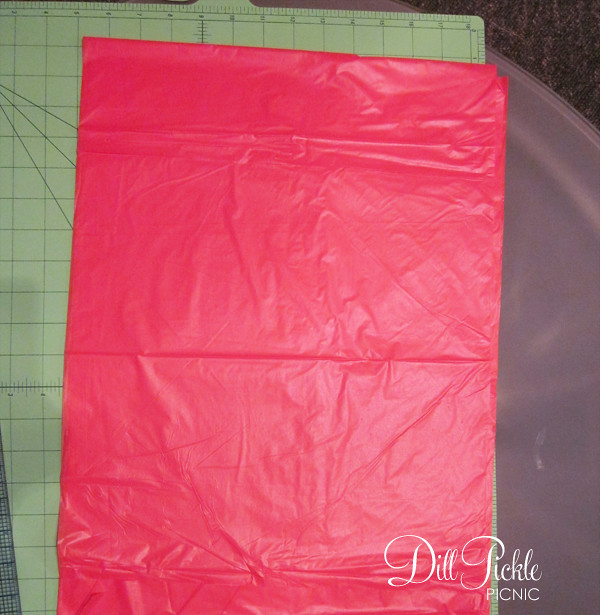
  1. Carefully unfold the initial vertical folds of your plastic table covering so that it is still folded vertically. (This will allow you to cut longer strips quicker and more precise).
  2. DPP-hallowpost4

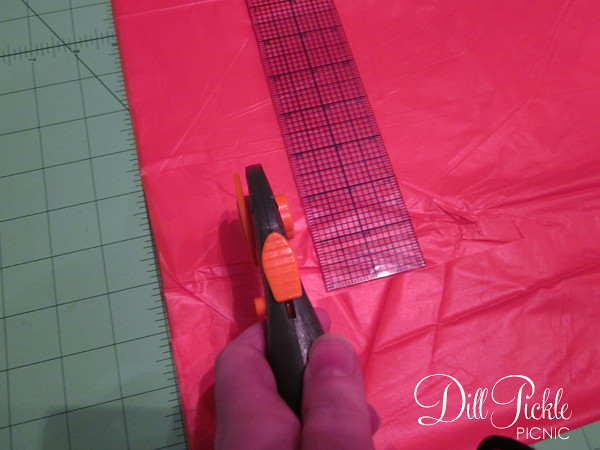
  3. Using your scissors or cutting tool measure over approximately 2 inches and cut up the length of the outside vertical edge of the table covering.
  4. DPP-hallowpost6

  5. Repeat 3 more times so that you have 4 strips.
  6. Carefully open up your strips so that you have one long piece. Hint I keep mine doubled so the color is a bit more pronounced.

Wrapping the Post:

  1. Using your tape attach the bottom of the first strip to the bottom of your post at the angle you wish your strips to run.
  2. Carefully wrap the plastic strips around over the tape and then start carefully wrapping the plastic strip up the length of the post. Make sure to keep the strips pulled just tightly enough to keep it in place.
  3. When you reach the top, use an additional piece of tape to hold it in place. Don’t worry about the tape showing since the bow will cover it up.

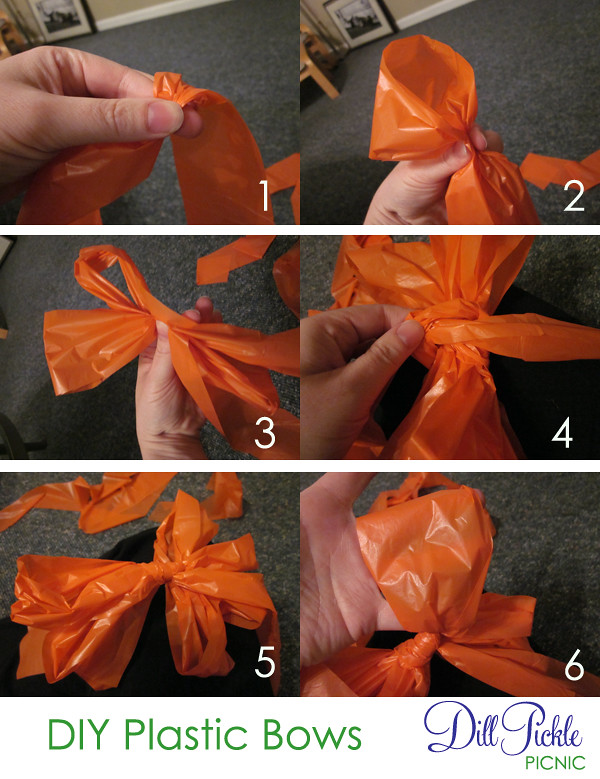
Creating & Attaching the Bows:

    DPP-hallowpost10

  1. Take the second strip (again I always use a double layer of the table cover) and hold it in your hand about 6 inches from the end.
  2. Make a loop folding it to meet your fingers in the center.
  3. Repeat on the opposite side. Repeat steps 2 & 3 until you have approximately 7 inches of the strip leftover.
  4. Loop the leftover strip around the center and tie the two ends together.
  5. Pull your loops to make them all uniform in length (it’s ok if it looks a bit flat at this point)
  6. Carefully open up the loops of the bow, pulling apart the two sections to “fluff” up the bow.
  7. Repeat using remaining 2 sets of table covering strips.
  8. Using the 6 inch trailers tie the bows around the top of the light post. By tying them all side by side it the bow will go completely around the top of the post and give a much fuller look.
  9. Either trim the trailers to have pointed ends, or tuck them inside the bows so that they don’t show.

The great thing about this project is I still had about 1/2 of my table covering left…which was a perfect size to either cover the long island in his kitchen (or make a Halloween wreath?). Also, since it’s made from plastic it wasn’t an issue when it started raining a few moments later!

DPP-hallowpost2

Total Cost: $1

You could also use this same approach using any of the plastic table covers found at your local dollar store…I’m thinking a red and white candy-cane look could be fun for Christmas!

Looking for more Fall or Halloween projects? Check out the side bar to the left for a quick listing!

DIY: Batty Cupcake & Food Flags

Well hello there! I’ve missed you guys while I’ve been toiling away on a huge work project that I wish I was able to share. It ended up being almost 100% DIY and has really tested my abilities to be both crafty, economical, and yet still extremely professional. Now I’m creatively tired. Does that make sense?

So, today lets talk about Halloween and how bats can be cute.
DPPbatstraw17Ready to make some of your very own?

Supplies Needed:

  • Black Paper or Cardstock
  • Glue or Glue Stick
  • Toothpicks
  • Bat Punch (or die cuts from your favorite machine)

DPPbatpicks-1

Instructions:

  1. Punch out your bats. I used a punch I picked up at JoAnn’s with a 50% off coupon. You could also cut them using your favorite die cut machine. You will need two bats for each flag you want to make. (Hint: with this punch I could get roughly 20 individual bats from one 8.5×11 piece of cardstock).DPPbatpicks-2
  2. Using your glue cover the back of one bat. I use a glue stick when I want to whip these up really quickly, but choose to use paper glue for the ones I sell in my store).DPPbatpicks-4
  3. Place your toothpick on the glued bat.
  4. DPPbatpicks-5

  5. Carefully layer the second bat onto the first, taking care to line up the edges all the way around. Make sure you press to seal the pieces together around the toothpick.
  6. DPPbatpicks-6

  7. Repeat & Add to Cupcakes or Other Spooky Snacks
  8. DPPbatstraw15

Want to jazz up your Halloween party a bit more? Repeat this process using straws to use when you serve up your “witches brew”.

DPPbatstraw3

Total Cost: $1 and up

See quick, easy…and cute! How will you decorate for your Halloween festivities this year? And, after you finish a big DIY project do you too find yourself creatively fried?

(Like these but have no time to make your own? Check out my shop for limited quantities available for sale!)


Life: Halloween & Etsy

Well hello there!  I’ve missed you the past week or so…but things have been busy in the Pickled household.  In the midst of everything I finally managed to get the Dill Pickle Picnic Etsy shop open!  Yay!  Right now it’s looking a bit sparse but I’m hoping to fill it up a bit more over the weekend.  So when you have a minute check it and let me know what you think!

It’s finally starting to feel like Fall in Georgia, and it makes me so happy!  I love fall, it means pumpkins, college football, Halloween, and deep colored clothing.  We will once again attend a Halloween party hosted by a family member and since he has me lead the decorating charge I’ve been checking out all the latest Halloween decorations.  And I found these fun little guys…

{image source: PB}

Which reminded me quite a bit of these little guys I whipped up for his party last year:

Check out this post from last year to learn how to whip up your own pumpkin lanterns using a few dollar bin items!

What about you guys?  What are you decorating plans for Halloween?  Any fun, yet cheap suggestions to share?

DIY: Flour Sack Boo-tiful Pillow Cover

I know Halloween is still a few months away, but I couldn’t resist posting this fun (and cheap) project now.  It was easy & cheap…plus it’s tied to the infamous  “envelope of doom“,  so that makes it even spookier 😉  My Boo’tiful Flour Sack Pillow Cover:

Supplies Needed:

  • Fabric for pillow cover, I used a Flour Sack Cloth from my local Dollar Tree.  You will one piece of fabric that is 14 x 14.5 inches.
  • Small Pillow or stuffing
  • Yarn or Other Trim to make letters
  • Sewing Machine with matching thread
  • iron & ironing board
  • glue (I used hot glue)
  • Ruler

Instructions:

  1. Gather all your materials and press the fabric to remove all creases.
  2. If using the thin flour sack fabric you will need to cut the fabric in half length wise.  If you remember I used the other half of this same piece of flour sack to make this fun fish pin board.
  3. Using your ruler pull the top edge of the fabric to the back 3.25 inches and stitch down along the bottom edge.
  4. With the sewn edge facing down, pull the bottom edge of the fabric up and over to the top 6.5 inches and press.
  5. Using your ruler pull the top portion down 7 inches.  It will overlap the pressed portion from step #4
  6. Take the folded fabric package to your sewing machine and sew both the left and right sides closed (leaving a 1/4 inch seam)
  7. Turn the pillow cover inside out and you are ready to use.
  8. If you don’t have a small pillow already you could either use a pre-purchased accent pillow form, or fill it up with stuffing 🙂

Then to make it boo’tiful:

  1. Place a piece of cardboard inside the pillow cover to keep any stray glue from gluing it closed.
  2. I wasn’t sure of my freehand skills so using a washable pencil I drew a quick outline of my letters.
  3. I took my spooky yarn from the “envelope of doom” and glued it around the letter outlines.
  4. To make it a bit more sturdy for future washings I added several stitches around the furry dots to hold everything in place.
  5. Let dry/cool
  6. Remove cardboard, stuff, and enjoy!

Total Cost:  $1.00 and up

DIY: No Sew Bow Tie

I’ve been making these quick bow ties for years.  They are great for quick dress-up items and even Halloween costumes and had originally put this quick & easy tutorial together as a set of images to share with a local crafty bride.  The day before her wedding she was looking for some last minute bow ties for photobooth props and not finding anything to her liking.  So, I snapped a few photos to get her started and then she rocked them out in her true artistic fashion.    Below is the quick and dirty tutorial to whip up your own photobooth or next impromptu costume.

Supplies Needed:

  • 1 piece of felt (or other fabric) for each bow tie.
  • elastic headband or wooden dowel
  • scissors
  • hot glue

Instructions:

    1. Start by cutting off the piece that will become the center of your tie.  If using a standard size piece of craft felt, just cut down one edge vertically and approximately 2 inches wide.
    2. Fold each of the edges of the larger piece of felt to the inside.  Hot dog style. I leave a small opening in the center to make it a small bit larger, but this is not necessary.

    1. Take the long skinny piece of felt, and fold in half.

    2. Take the large piece from step 3 and squish it to the center (from both the top and bottom) to create the “bow” shape.
    3. Use the skinny piece to wrap around the center of the bow to hold it together.  Secure the piece to the back of the bow with hot glue and then trim the excess length off with scissors. If you are using an elastic headband for your bow tie secure it underneath this center piece as well.
    4. Ready to wear…either as a bow tie or a large bow headband.  Or if you are using for a photobooth attach a wooden dowel to the back as perfectly demonstrated by the Über creative Lauren (go ahead, link over and check out her super fun photobooth photos while you are at it)


So, there you have it a no sew fun bow tie in less than 5 minutes!  Try them out, you’ll have fun I promise 🙂  How will you use your no sew bow ties?  Wedding photobooth props?  Halloween costume?

Happy July

I missed getting this posted by the 4th, but I still wanted to show of the cute little trinket I whipped up to wear out for the 4th of July festivities.  Using some beads from my stash, and a fun thrift store find I was able to show my “colors” while snacking & watching fireworks with my hubby.  We’ve decided next year we might even throw a bash of our own 🙂


What about you guys?  What did you do over the holiday weekend?

DIY: Mother’s Day Napkin Wraps II

I can’t believe in my haste to finish up all my April Stash Busting projects (which I will begin to post this weekend) I almost forgot to post the second round of Mother’s Day Napkin Wraps!  Hope you enjoy Part II which we’ll call the “Mother’s Day Floral Set”


Click to Download: Pink Roses Napkin Wrap


Click to Download: Pink Daisy Napkin Wrap

All templates use the Monterey BT font which is free to download from Sofontes.  New to Napkin Wraps?  No worries, visit this post for step-by-step instructions on how to use my napkin wrap templates!What do you have planned for the mothers in your life to celebrate Mother’s Day this year?

DIY: Mother’s Day Napkin Wraps

I am trying to get a slight bit ahead with posting holiday napkin wraps…my mom would be so please! Speaking of Moms here are a few napkin wraps inspired by the mom’s in my life.  Hope you enjoy Part I which we’ll call the “Mother’s Day Tea Set”

Let’s kick this off with a simple pink background.  This would be great for a Mother’s Day Brunch, Tea Party with the girls, or even a pink wedding.


Click to Download: Pink Background Napkin Wrap Template

And a simple tea kettle that looks fun printed on colored cardstock:


Click to Download: Tea Kettle Napkin Wrap Template

A finally, a pretty china tea-cup!

Click to Download: China Tea Cup Napkin Wrap Template

All templates use the Monterey BT font which is free to download from Sofontes (see link on templates page).  New to Napkin Wraps?  No worries, visit this post for step-by-step instructions on how to use my napkin wrap templates!

What do you have planned for the mothers in your life to celebrate Mother’s Day this year?

DIY: Easter Napkin Wraps – Religious Themed

I have a friend putting together a ladies pre-Easter brunch at her church who asked me if I could put together a couple of reusable religious themed wraps.  So using MSClipArt (I’m being lazy since I’m so swamped at work) I whipped up several options that could be used not only at Easter but for other events later in the year.

Let’s start out with a pastel cross theme:


Download Template:  Pastel Cross Napkin Template

And then my friend requested a black & white option with a bible theme:

Download Religious theme template: Black & White Bible Napkin Template

All templates above use Monterey BT font which is free to download from SoFontes (see link on templates page).  New to Napkin Wraps?  No worries, visit this post for step-by-step instructions on how to use my napkin wrap templates!

DIY: Pink Lily Napkin Wraps

Yesterday a reader sent me an email asking for a template featuring an Easter Lily, and since I am always so excited to hear from someone who reads my little blog I couldn’t turn her down.  So, Becky…this one is for you and thanks so much for your kind words!


To Download Template:  Pink Lily Napkin Wrap Template

All templates above use Monterrey BT font which is free to download from SoFontes(see link on templates page).  New to Napkin Wraps?  No worries, visit this post for step-by-step instructions on how to use my napkin wrap templates!

It’s true what they say about comments being the crack for bloggers…so what say you?  Any suggestions for future templates that you’d love to see?