This is a project I have wanted to attempt for quite a while. I’ve read several tutorials utilizing freezer paper for applique methods wondered if it was as easy as it seems. All in all I’m happy with how it turned out, but I did have several problems along the way.

Materials Needed:
- Freezer Paper (not pictured)
large enough for pattern and an inch margin on all sides - Fabric to applique
I choose to use a Flour Sack from my local dollar store - Thread in corresponding color
- Photo Frame with the glass removed
I used an 8×10 frame we had in the basement - cork or Styrofoam – should be large enough for frame opening
I used Styrofoam since it is readily available in the trash heap at my office.

Tools Needed:
- Marker to trace pattern (or print directly on freezer paper)
- Scissors
- Iron & Ironing Board
- Sewing Machine
- Xacto knife or cutting tool
Instructions:

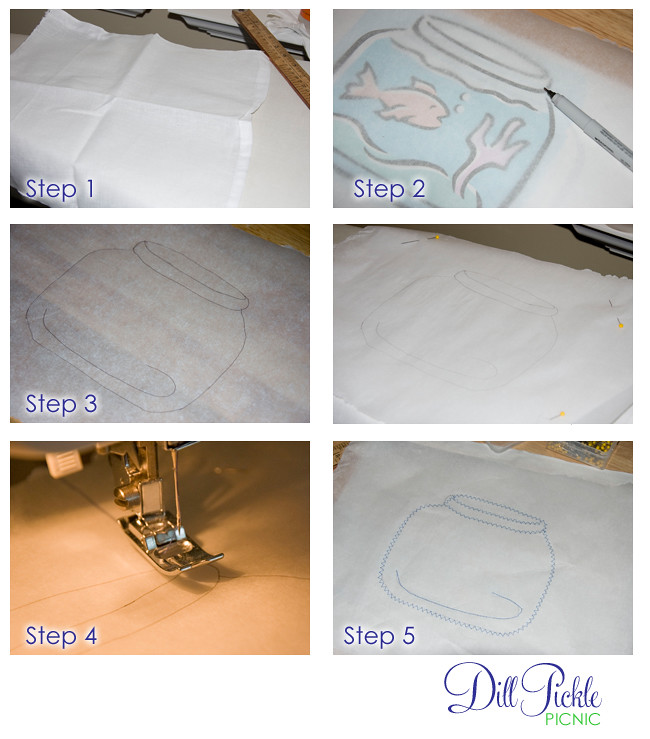
- Cut your material down to the correct size. Measure the opening to your photo frame and add 1.5 inches to both the horizontal & vertical measurements. You will use this later when attaching to the frame.
- Transfer your pattern to the freezer paper. This can be accomplished in one of two ways. I chose to simply print out my template and use a marker to trace it onto the freezer paper. However, you could also run the freezer paper through an ink jet printer on the paper side.
- Remove your pattern and center your pattern in the middle of your piece of fabric, paper side up. Using the iron with no steam, press your freezer paper to the fabric. I was a bit unsure how it would hodl so I also pinned the corners for added “holding power”.
- Now using your sewing machine, simply sew over your template lines using your favorite stitch setting. For my message board I chose to use a fun zigzag stitch. You can see I got off my pattern a bit, but don’t worry…you can fix this later.
- Remove the fabric from your machine and carefully tear the freezer paper away. This is where I had issues…major issues. I ended up having to use the craft knife to carefully cut the paper away. I don’t recommend this since it’s also easy to cut your stitching this way.

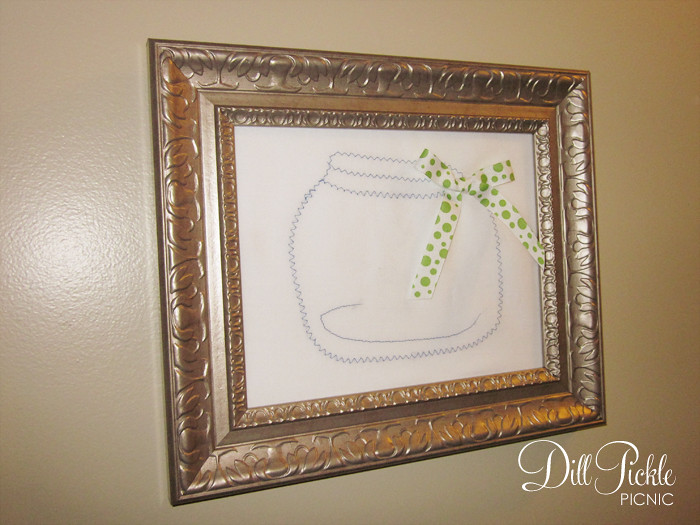
- Now is the perfect time to embellish your fishbowl a bit. Remember by mistake, I decided to use some leftover wedding project ribbon to add a colorful bow to this fishbowl. I just tied the bow, trimmed and singed the edges of the ribbon, and then stitched it to the fabric. Press the fabric when you are finished to create a smooth surface for your message board.
- Now it’s time to cut your cork or Styrofoam. The easiest method I found was to place your material on a cutting mat. Take the glass you removed from the frame and place onto your foam. Line up the outside edges so you have fewer cuts to make.
- Using an Xacto knife (and being careful not to cut yourself on the glass edge) cut around the edge of the glass pane. Make sure your cuts are over your cutting mat.
- Time to put it all together. Carefully center your fishbowl fabric over the cut piece of foam/cork. You could easily use spray adhesive on the back of the fabric to help hold it in place while you complete the assembly.
- Take your foam/cork sandwich and insert into the opening of your frame, and fold edges to the center of the foam/cork. I used clear packing tape to hold the edges down.
- Replace the back of the frame. If it doesn’t sit completely flush, you could also use clear packing tape to hold the back securly to the frame. This is necessary to keep everything all nice and wrinkle free.
- Hang and Enjoy
Everything used came from my stash, except the Flour Sack towel from the dollar store.
Total Cost: $1.00 and up

Cute huh? Oh…wait….where are the fish? Don’t worry! I have a post about fish coming up later!
So, overall I wasn’t impressed with my first experience using freezer paper. Have any of you out there given it a try with better luck? If so, please help me out…what did I miss?

I love this and the thumb tacks! What a fun idea. Thanks for sharing, I’ll be linking.