Semi-DIY: Embellished Vendor Apron – Reveal

A few weeks ago I posted a link to help with making 3D fabric flowers, with the following teaser photo:

And now that the finished product has made its way to the lovely vendor recipient, I can show you the finished product.  First, a little back story:

For our June wedding I was sure I needed or even wanted a DOC (day-of-coordinator).  I plan things fairly regularly for work, so really this shouldn’t have been any different.  Only…it was!  In addition to the wedding planning I was also in the middle of some serious work-place drama and stress.  Due to family situations that just went from bad to unimaginable my boss stepped back for several months , leaving me & our assistant to “hold down the fort”.  I thought I was managing everything quite well…until a discussion over table linens left me a sobbing mess, standing in Ikea, on Valentines Day.  It was that day Brainy and I agreed I needed help.  We worked to find vendors to scale back my DIY efforts and he took over several areas of wedding planning (Honeymoon & Music to name a couple).  One of those vendors was our florist.  Since we were getting married in such a small town I was really, really worried about the florist in particular.  I grew up in a small town, and had never had a great floral experience with anyone there.  Everyone we asked recommended her, and it was often just assumed that brides there hired her to be their DOC as well.  After our first meeting I was sold on her as the florist, but not sure I needed a DOC.  Then Brainy reminded me of Ikea and said for the low cost it would be fine….and you know what?  It was more than “fine”.  She rocked!  Honestly, I still feel like we didn’t pay her enough, and the best thing was she didn’t seem like a vendor.  Instead, she felt like a long lost family friend and everyone that met her at the wedding raved about how sweet and helpful she was.  So, I decided I wanted to “create” her a small token of appreciation (in addition to rave reviews) but I wasn’t sure what.  One afternoon I remembered a funny conversation we had during the days leading up to the wedding and it hit me, she needed a frilly apron. 

So, using some leftover fabric she had painstakingly decorated our cake table with and a few other items, I whipped up a functional frilly apron to keep her clothes all clean when she is working on her floral goodness.  Since I haven’t sewn in a few years (at least), I was super happy with how it turned out.

Remember those 3D Flowers?  I created 3 different matching flowers and attached half of a snap to the back of each one, then sewed the back half of one of the snaps to the top of the apron.  So she can change them out, and easily remove it for laundering.  Notice how the frills didn’t cover the whole apron?  That way she isn’t wiping her hands on the ruffles.  And yes, I hand embroidered the shop name on the top. 

I’m hoping she loves it almost as much as I loved having her keeping our wedding in line!  Let me know if you are interested in a tutorial for this project and I’ll put one together and post.

Registry Review – Ona Pitcher

Several people have asked me recently what my favorite things from our wedding registry are.  It’s one of those things where I can’t just pick one…so between crafty fun I’m going to recap a few of our faves and why.

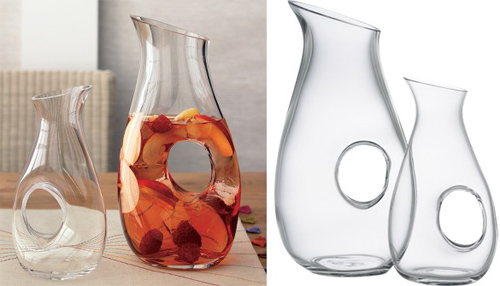
Today we made the trip to our local Crate and Barrel to exchange some extra glasses… but since the bath mat we had our hearts set on wasn’t in stock we left with a gift card instead.  Now, I’ve decided I’ll be using it on a couple of these Ona Pitchers.  They come in two sizes and are quite stylish too!

onapitcher(photo source: Crate and Barrel)

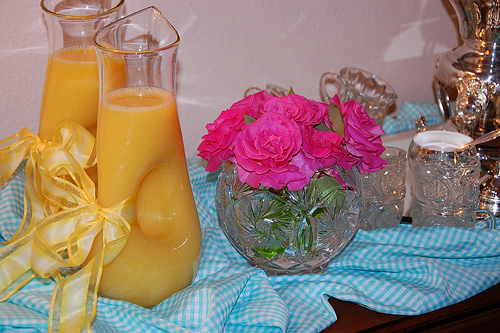
So, I know you’re thinking but how can you review something you’ve never used.  In April some of my best friends and their moms honored me with a bridal coffee and the local hostess-with-the-most  had 4 of these pitchers she used for water and OJ.  I fell in love with them then and there.  They are the perfect size, and I love how they can be both simple and elegant.  These beauties can make store bought lemonade look homemade 🙂

3654932454_03de020704(photo source:  personal photo)


DIY – Framed Fabric Table Numbers

To start with I wasn’t sure we would even need table numbers.  We hadn’t’ planned on a seated dinner, but then realized it would be easier on both our event staff and our guests if we tackled assigned seating.  Of course that meant more DIY projects since that single decision yielded the need for escort cards, table numbers, and perhaps seating cards.  I didn’t like the idea of a piece of paper on a metal stick.   While I think they are perfectly fine, I just didn’t think they’d fit our “not-so-shabby chic meets French Garden” wedding.  So I went to my standard go-to for wedding inspiration and found some framed table numbers on Weddingbee to use for inspiration and then gave it a little different approach for a look that really fit with our table decor.  I think they turned out quite well 🙂

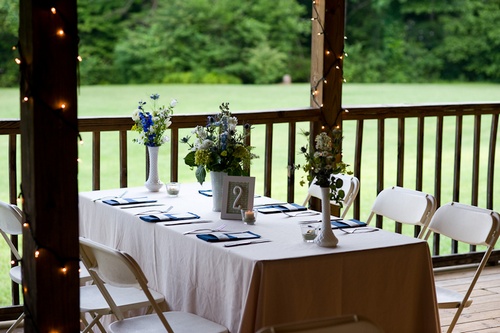
table01(photo credit:  Climie + CO)

Tools Needed:

  • Hot Glue Gun & Glue
  • Scissors
  • Paint Brush
  • Tape
  • Paint in desired color

Supplies Needed:

  • 4×6 ” Frames (make sure they have glass panes)
  • Fabric (1/2 yard or so per 5 frames)
  • Wooden Number(s) for each table.

Getting Everything Ready to Assemble:

  1. Disassemble your frames.  Doing this all at once will mean you can put them back together in a more assembly line type process which will go MUCH faster.
  2. Paint your frames if they need to be a different color.  I realize that it might be easier & cheaper to buy unfinished frames and paint them.  Had I not found white frames I liked I would have done the same thing.  This is the step where you should paint the front and sides of your frames.  Let them dry and then flip them over to paint the back.  I also think spray paint might work well for this, especially if you could hang the frames on a makeshift clothes line so they could hang and dry more quickly.
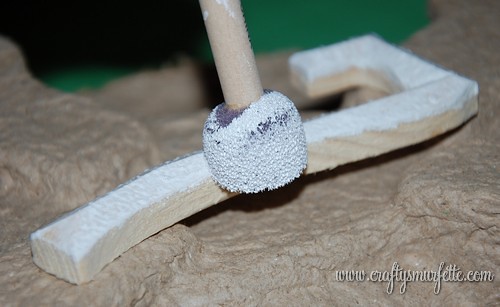
  3. Paint the wooden numbers.  Since they are unfinished it may mean you need multiple coats of paint to produce a solid coated surface.  Since I wanted a more textured look to my numbers I used a foam stencil brush and “dabbed” them up and down with paint.  It gave it a more textured finish than painting them with a regular brush in a back and forth motion.
  4. Let everything dry.  I painted my numbers one night and then left them to dry until the following evening before I started assembly.

Assembling the Table Numbers:

  1. Take one of the pieces of glass and lay it on top of your fabric to use as a template.  Use your scissors and cut around the piece of glass, leaving about an inch of fabric on all sides.  Repeat this step for the number of tables you will have.  We used two different prints and had 10 tables, so we cut 5 blue pieces and 5 green ones.
  2. This is where the assembly line process kicks in (so if you have buddies over to help you can assign each one a task).  Go ahead and plug in your glue gun and get that bad boy preheated.  And no laughing at how old my glue gun looks…because it is!  My mom gave me her OLD one when I left for college 10 years ago, and it still works so I still have it!  Thanks Mom! 🙂
  3. Take a piece of your fabric and place it face down on a flat surface.
  4. Place a piece of glass centered on top of the fabric.
  5. Pull up one of the long sides of the fabric wrapping it around the edge of the glass and using scotch tape secure it to the glass.  Shocked that I used tape for attaching the fabric instead of glue?  By using tape we were able to easily remove the fabric and reuse the frames after the wedding!
  6. Repeat this process on the other long side, making sure to pull the fabric tightly against the glass to make a smooth surface.
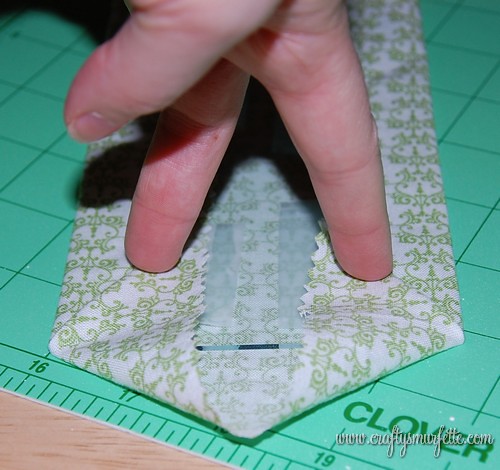
  7. Now, take the fabric on the end of the glass and push it in from the sides to make two triangular flaps.  Pull the back flaps back firmly against the glass and tape down.
  8. Then pull the top flap down over the bottom one and also tape it securely to the glass.  Repeat this process on the other side of the glass plate and then turn it over to make sure you have it all tight and smooth. This is where you could pass it off to someone else if you’d like.
  9. Now it’s time to reassemble your frames.  Place the covered glass pane back into the frame with the covered side exposed.  Then place the frame backing into the frame and reattach with side slides or press down the staples (depending on how your frames are structured).  Then pass the reassembled frame off to be glued.
  10. First play around and decide where you want your numbers to lie on the frame.  I wanted everything centered which made it really easy to stick them and move on.
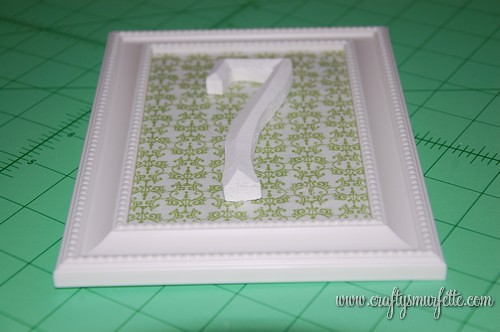
  11. Break out your trusty glue gun and apply a thin line of glue to the back of your painted numbers and then quickly position them in the center of the fabric area.
  12. Hold it down until solid, and you are DONE.  Pack them up and mark table numbers off your list.

For ReUse After the Wedding:
Using this method made it possible for use to reuse the frames after our event, AND even sell the fabric/number portion to another bride and save her some work! I call that a win-win!  To reuse simply take the back off the frames and remove the glass plate with the fabric/number still attached.  Simply peel off the scotch tape and separate the fabric from the glass.  As long as you used a light weight Cotton fabric the glue won’t have gone through the fabric and it will slide right off.  You might need to clean the glass panes, but otherwise your frames are ready to showcase your beautiful wedding photos!  This is how my mom reused them for our hometown reception.

3773399031_c879735e1c

This is what we were left with once we took the fabric off the glass….see they are all intact and ready for someone else to use with the frames of their choice or even save for a future event!

Cost Breakdown & Ideas for more savings:
Frames: We used white wooden frames that my mom already had to use for our hometown reception to display wedding photos (and later gift to several family members).  However, for this mock-up I used white plastic ones  I picked up for $1 each at Dollar Tree and I actually think with the beaded edge they look nicer , plus they are lighter weight for those needing to pack & transport.

Fabric: $1.00 from the Dollar-a -Yard section at Hancock Fabrics we had leftover from covering our jam jar escort cards/favors.  We purchased a yard of each fabric and used approx. 1/2 a yard of each color for (5) 4×6 inch frames of each color.  You could also use leftover scrapbook paper like this or wrapping paper like this.

Wooden Numbers: $6.24 (including tax) for 11.  From Michaels (purchased during a 40% sale).  Using coupons at craft stores like Michaels, JoAnn’s, or Hobby Lobby can really save you alot of money!  Sign up for each of their email programs to get advance notice of big sales and extra coupons sent directly to your inbox.

Paint & Brush: Free since I already had them from some other project years ago.  These are also items you could pick up for a buck at Dollar Tree.

Total for 10 Tables: $18.96 (w/Dollar Tree Frames)
Price per Table: $1.89 (w/Dollar Tree Frames)

Semi-DIY – Pumpkin seating cards

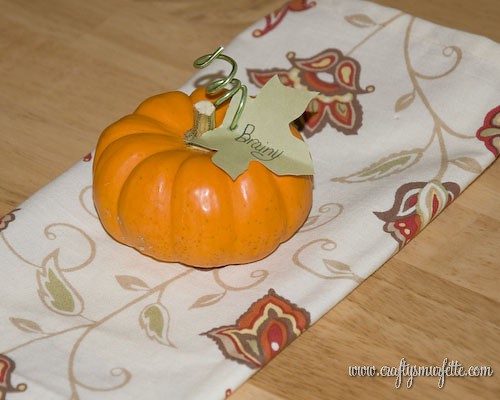
I saw some cute pumpkins sitting on place settings as I strolled through a cute little boutique near my house not too long ago and thought…hum, I could do something like that for Thanksgiving.  So I decided to give it a shot to see how “doable” and “economical” it would be for our family Thanksgiving dinner…and you know what I think it’s a real winner. 

Tools & Supplies Needed:

  • Mini Pumpkin or Squash for each place setting
  • Paper to use for leaf name tag
  • Green or Brown wire
  • Marker or Pen
  • Kraft Knife or Ice pick
  • Scissors
  • Leaf Template

Instructions:

  1. The first step is to cut out your leaves and label them.  For the first attempt (as shown in the photos) I simply printed out some leaves I found on good old Microsoft Clip Art on the back side of my green paper, and then cut them out with scissors.  Then used my trusty black calligraphy pen to write on the names. 

    Then I remembered something that would have worked MUCH better.  The Cuttlebug with the leaves dies.  I already owned them so it was a no brainer.  If you aren’t on the Cuttlebug bandwagon I wouldn’t advise buying one just for this project…unless you have 100’s to do.   In that case I’d recommend buying the dies (under $20)and trying to find someone who would either cut them with their machine or loan it to you for a day.  Heck, email me and if you provide the paper I might run them through it for you in exchange for gift cards 😉
                      (source for both machine & dies:  Provo Craft)

  2. Next it’s time to make the wire coils you’ll use to attach the leaves.  I picked up the wire I used in the little floral section at Dollar Tree.  You could make almost 20 little coils from one package.  Cut off a piece of wire approx 3.5 inches and wrap it around a pen or marker to shape it into the coil. 
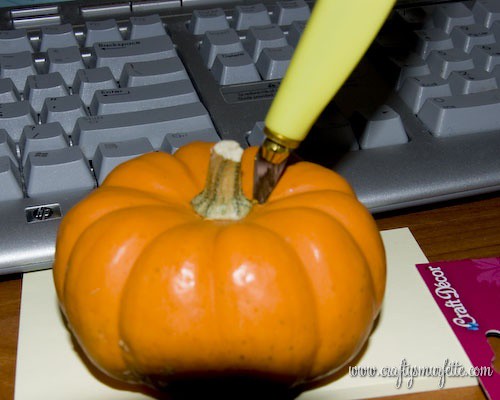
  3. Use your Kraft knife or even an ice pick to poke a small hole in the pumpkin top near the stem.  It should be just a tad bit small than the wire’s diameter to hold it steady.  Have a towel handy to dry off the juice that will seep out when the hole is first made.
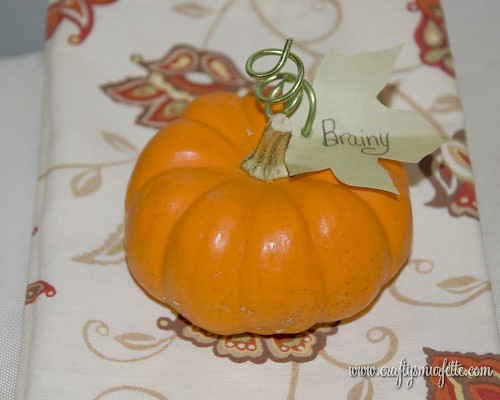
  4. Use the knife to make a small cut in the leaves and feed the bottom part of the wire coil through the slit, and place the wire into the hole you created in the pumpkin. 
  5. Push the leaf against the pumpkin and adjust the wire to your liking, then display on a fun fall napkin or onto of your place setting and enjoy.

Price Break Down:

  • Mini Pumpkins – purchased at Wal-Mart Super Center for $0.78 each
  • Green Aluminum Wire – purchased at Dollar Tree – $1.00 for 6 feet
  • Green Paper – Michael’s scrapbook paper – $0.50 per sheet/20 leaves
  • Template – free from MS Word
  • knife, pen, scissors – free already had

TOTAL:  For 20 placesettings = $17.60 so $0.88 each

Overall, I’m proud with how they turned out, especially for 88 cents each!  What do you think?  How will you set your Thanksgiving table?

Semi-DIY – Fabric Petal Flowers

This weekend during all the rain I *gasp* pulled my sewing machine of the basement to finish up a project I started as a gift to my florist/day of coordinator.  I’m super pleased with how it turned out and I hope she feels the same way.  However, I’m being a bit of a tease since I won’t post photos of the finished product until she receives it in the mail.  BUT…I will show you a small piece of the finished product because it could have SO many uses.    The 3-D Fabric Flower!

I played around and made several of these (or at least something similar) using leftover scraps from covering our jam jar favors.  Then I found this tutorial at …and All Things Nice that explained things much better and my flowers came out much cleaner this way. 

I made very few changes:

  • I added in an extra petal
  • My circles were 3 inches in diameter since I already had them cut out from a previous project and wanted larger flowers anyway.
  • I added leaves to the back of my flowers.
    • For some flowers I used left over felt to cut out a leaf shape which I stitched around with embroidery threat and attached it to the back of the flower
    • For others I simply cut out a larger circle and made two leaves using the petal technique from and All Things Nice‘s turorial
  • I attached a small circle of felt to the back of the flower and attached the button before it was attached to the final product
  • Instead of sewing my flower to the end product I attached a snap to the flowers and the backside to the final product.  This way they can be changed out for several different looks.

There are so many ways you could use these flowers!  A few running through my head right now are for:

  • attach a stem and use a bunch of them for a floral arrangement
  • attach stems and use a bunch for a rehersal bouquet for a wedding
  • a toss away bouquet for a wedding
  • a fun pin to add to a wool jacket
  • a fun pin to add to a hat or boggin
  • attach to a hair elastic or barrett for a cute little girl’s hair decoration

Here is a teaser of what I used my fabric flowers for 😉

What will you use your fabric flowers for?


Inspiration – French Wire for Fall

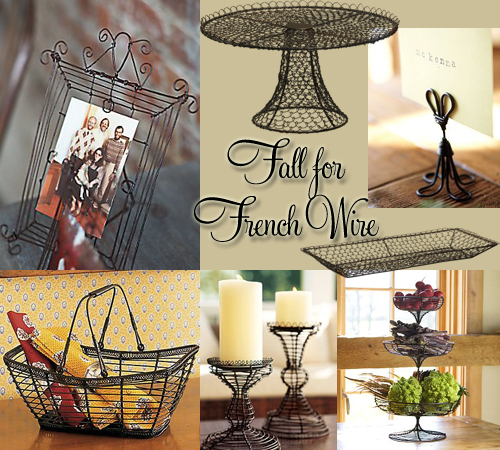
I keep drifting to fun pieces of “french wire” this fall.  I think they would be wonderful for a fall wedding or your Thanksgiving spread.  I also think they are timeless pieces you could use for years to come.

board_frenchwire

(source clockwise from top left:  Wire Sculpture Frames from Anthrpologie, Wire Pedestal from Crate & Barrel, French Wire Place card holders from Pottery Barn, Wire Tray from Crate & Barrel, French Wire 3-Tier Stand from Pottery Barn, French Wire Pillar Holders also from Pottery Barn, and French Wire Basket with Handle from Pierre Deux)

Why do I love french wire so?  First up, I posted about these Wire Sculpture Frame from Anthropologie weeks ago and I’ll admit that I’m debating ordering a few for our guest room.  Then I ran across this wire pedestal and tray from Crate & Barrel.  It will hold a 12 inch cake with style, and for $18.95 it’s a deal as far as pedestal’s go.  I could see it with a vintage lace doily on the pedestal with cupcakes stacked on top (or a yummy carrot cake).  And wouldn’t the tray be fun for holding cookies or other baked goodness?  It’s also only $18.95.  Then there are thesese place card holders from Pottery Barn.  They would not only make nice place card holders, but I could also see them holding table numbers, menus, food labels, and even photos on my mantle!  Then a simple search for French Wire on the Pottery Barn site yielded more goodness in the 3-Tier Stand, Pillar Holders, several baskets and even a French Wire Chandelier. And you can’t beat Pierre Deux for French Wire Baskets. 

What’s new out there right now that just screams fall decorating and parties to you?

DIY – Lining Envelopes – Making Templates

One of the simplest and most cost-effective ways to jazz up your DIY invitations, thank you notes, save the dates, etc. is with lined envelopes.  I used liners to take “just ok” but economical Michael’s Thank You notes to the next level (you can see them in this post) but since I’ve been asked several time how to line an envelope and where to find templates, I decided to just create a post on making your own template for lining envelopes and list out the best resources I’ve found.
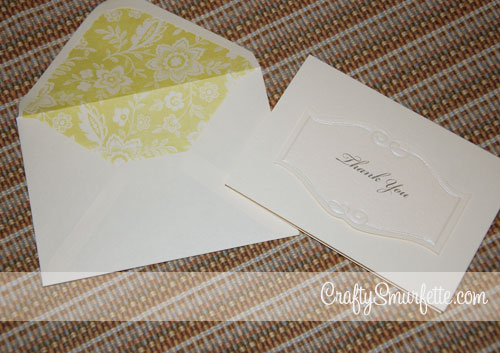
There are quite a few DIY guides out there to how to make envelope liner templates, and I’ve used quite a few of them.

  • This one from Being Crafty has quite a few references to helpful templates
  • Paper-Source is of course the go-to for premade liner templates sized to match their envelope stock.  They sell the liner templates in a package that contains the 4-bar, A2, A6, A7, A9, 5 3/4″ square and 6 1/2″ square templates.  They are made from a sturdy plastic and if you plan to use either Paper Source or Waste Not Paper envelopes the $9.50 is worth it for a perfect match.
  • Paper-Source also sells precut envelope liners in quite a few prints and solids (for those who want the look with less work). These will also fit Waste Not Paper envelopes as well.
  • For the really custom look, You can also create your own envelopes with the Paper Source envelope template kit.  This $15.00 kit also contains sturdy plastic templates for 4-bar, A2, A6, A7 and 5 3/4″ square envelope sizes.  I’ve used these to make envelopes from old maps and lined them with a solid paper that turned out really cute.

But what happens when you don’t live near a Paper-Source, and don’t have time to have the templates shipped to you?  Or what do you do if you have envelopes with square flaps?  or pointy flaps?  Then you do what I’ve done several times through the wedding planning process, make your own template!  It’s really not hard at all….

Tools Needed to create Envelope Liner Template:

  • A piece of Stencil Plastic or other clear plastic to make liner template
  • Black Sharpie Marker
  • Scissors
  • Kraft Knife & cutting pad

Materials Needed for Lining Envelopes:

  • White School Glue Stick or Double Sided tape
  • Printed Paper for liners (a thinner paper works best, I used thin scrapbook paper or a thicker wrapping paper)
  • Envelopes to be lined
  • Kraft Knife & cutting pad
  • Bone folder
  • Optional heavy books to hold paper still

Instructions for Creating  your template:
The one thing I like to do when I’ll be using a particular sized liner over and over is to create the template in a bit more sturdy fashion to keep the wear and tear to a minimum.

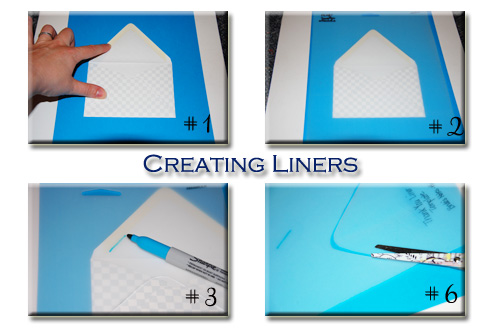
  1. Take one envelope and place it on a firm surface like a cutting mat.
  2. Place the sheet of stencil plastic over the envelope, tape it to your table to help hold it in place if needed.
  3. Using the Sharpie marker start tracing around the inside of the flap on the inside where the glue-line stops.  This will allow the liner to fit right below the sticky part that seals the envelope.  Follow the glue line to the outside edge of each envelope.
  4. Next trace just inside of the bottom edge of the envelope.
  5. Finally place a ruler to connect the top lines with the bottom line.  Move this line just inside the outside edge of the envelope to allow the liner to slide down inside the envelope.  Repeat on the other side.
  6. Cut out the liner and label your template with a sharpie so you’ll have it handy next time you need to line a new envelope of this size
TY_002

Instructions for Using an Envelope Liner Template:
Paper Recommendations & Notes:

Now, you are ready to use your liner to cut out the liners from your selected paper.  I recommend a thinner stock of paper for envelope liners for several reasons.  1) it is easier to work with when it comes to folding down the flaps and 2) it doesn’t add as much extra weight to the envelope.  For those using liners for wedding invitations or the such you know how much drama extra postage costs can be.  So a thinner liner paper equals less added weight to worry about paying for later. For the most recent set of liners I used thin scrapbook paper from a bulk “My Minds Eye” book of papers.  I liked how it had a variety of “vintage” floral prints.  If you are making 4-Bar sized envelope liners, a piece of 12×12 paper you should be able to get 4 liners with a small piece left over that would be a perfect size to reuse as a belly band if you are also DIY’ing your invitations. You’ll also find for A7 & A9 liners you will have less wasted paper left-over if you use standard sized paper (8.5 x 11), with A9 liners using the standard paper will also equal less cuts!

Cutting Out Your Envelope Liners:
There are tons of how-to articles out there on how to cut out envelope liners, and they are all equally helpful.  Everyone has to find the way that works best for them.  Some cut out each liner individually after using the template to draw around the back.  That works wonderfully, however, I had over 100 of these to cut out and I found that a little too slow.  So I came up with a slightly different way to go faster with more uniform cuts.  Again there is no right or wrong way to do this…just find the method that words best for you!

  1. Place your cutting mat on a sturdy flat surface.
  2. Stack 2 or 3 sheets of your paper to be cut so that all the edges are perfectly in line.
  3. Place stack of paper onto the cutting mat, making sure that everything is still perfectly aligned.  I like to line up the paper using the grid on my mat to ensure I end up with straight lines.
  4. Optional:  Place a couple books or other heavy objects in the middle of the paper to help keep everything firmly in place.  Sewing or pattern weights would also work great for this. 
  5. Lay your liner template down in the bottom left corner of the stack of paper.  Take care to align it on both the bottom and left sides, which will give you fewer cuts to make.  And few cuts = saved time!!
  6. Using one hand to hold the template steady, use the other to run the Kraft knife firmly around the edge of the template.  Make sure to apply enough pressure to cut through all the layers of paper, and keep the knife blade firmly against the edge of the template for the smoothest cuts.
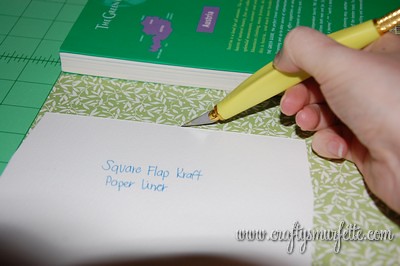
  7. Remove the liners you just cut and move the template to line up again in the lower left corner of the paper.  Repeat on the top section of  your paper after you have cut all the way across the bottom.  If you are using wrapping paper make sure to cut off a piece that is no longer than your cutting mat so it is easier to manage.  Once you have all your liners cut out…it’s time to put them in the envelopes.
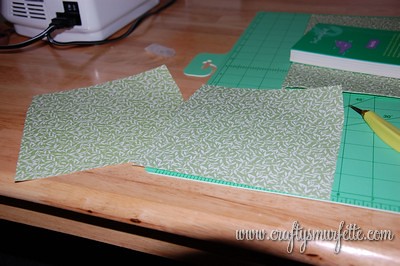
  8. Slide the new liner inside the envelope and line it up so that the top of the liner is just below the glue line. 
  9. Turn the envelope over to the front side, and flip the flap backwards so you are looking at the back of the liner paper.
  10. Apply glue stick to the back side of the liner paper
  11. Press flap firmly down onto glued area.
  12. Flip the envelope back over and use the bone folder to carefully run along the inside edge of the fold while you close the envelope.
  13. Once closed use the bone folder to run along the fold to ensure the envelope will stay closed.  

(Optional Tip):  If you have a Scor-Pal (mine came in really handy during the wedding prep) you can set up a scoring template and easily score all your liners really quickly.  To do this line up the base of the envelope in the upper corner and mark the correct line on the tray with a post-it note to serve as your template to know where to score each liner.

Using this method I was able to cut 16 liners in 5 minutes, which is MUCH faster!  Hope this helps a few of you out, and if you have questions please don’t hesitate to email me.

**Note** I do not work for nor do I receive any support or benefit from my recommendation of any products or corporations.  These are purely my options based on my experiences with these products and corporations.

DIY – Fall Napkin Wraps

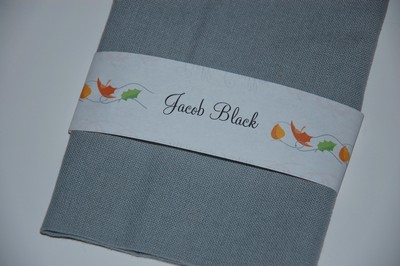
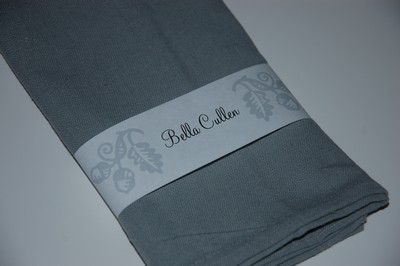
Several of you have emailed me asking for a more fall themed napkin wrap template to use for fall receptions and thanksgiving …so tonight I put together a couple I really like.  Honestly, I’ve been a little shocked at the interest in my little last minute wedding DIY…but I’m so glad others are finding them useful.

Pumpkin Template
I ran across this adorable pumpkin clip on illustrator Tricia Rennea’s blog as a free download a few weeks ago and bookmarked it to use for something “fall related”.  So it was the first fall themed wrap.  I think they are really cute as a napkin wrap.

(csmurf_pumpkinnapkins)

Speaking of  Tricia Rennea if you haven’t already check her out, she does such great illustrations and has a storefront for purchasing some of them on shirts, etc.

Fall Leaves
This inspiration from this one came from good ‘ole Microsoft Clip art.  I think it might be making an appearance at our inaugural Smurfy Thanksgiving this year.

(csmurf_leavesnapkins)

Simple Acorn Template
Again this one came from Microsoft Clip art and then I converted it to a watermark to lighten it up again.  I actually like how well it matches our everyday napkins I used to take the photo!

csmurf_acornnapkins

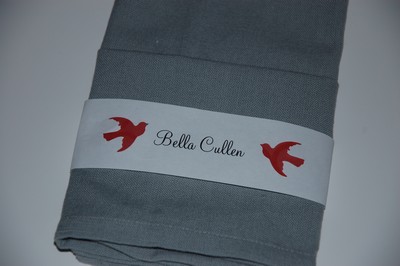
And two more photos just to show you how creative you can be with this little guys.

For example this is what happens if you delete the graphics on the templates and instead use a simple paper punch.  This one is with Martha Stewart’s dove punch.  See how nice it looks that the color of the napkin pops through?

Wouldn’t this be fun with a snowflake punched out for a winter wedding?  Or an ornament for Christmas Dinner?  And for a little more color, what about adding a strip of colored paper behind the punch outs. (please ignore my paper quality… my home office is mid-remodel so I can’t find all the fun papers right now).

Hope this gives you a few more ideas to make this little DIY project work for you.  If you have questions….let me know!

Semi-DIY – Hometown Reception Invitations

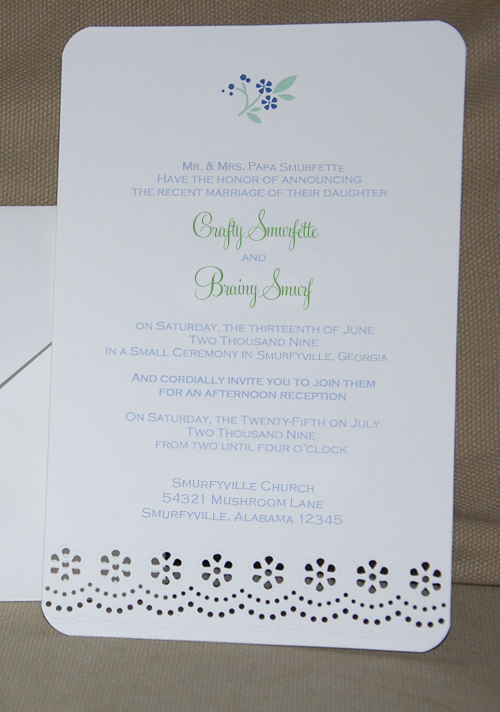
Like I mentioned in a previous post we used clearance invitations for our hometown reception and I think they turned out lovely.

hometown_004

Tools Needed:

Supplies Needed:

  • Martha Stewart Eyelet Invitation Kit (currently on clearance at WalMart and Big Lots)
  • Thin scrapbook paper or wrapping paper for envelope liners (optional)
  1. Download the templates from the Martha Stewart to your computer.  
  2. Use these templates to put together your text and graphics for your invitiations, response cards, and return addressing on the envelopes.  Since we were using these for a hometown reception I could use elements to tie them to our wedding invitations.  We used the same colors and fonts,  I even included a flower from that set as well.  
  3. Print out your invitation first on the templates provided in the kit, this will allow you make sure your margins, etc are correct.  You can also do this with the response cards and envelopes.
  4. Print out the remainder of your items.  I printed my invitations in groups of 25, but you’ll need to rest to see how many your printer works best with.

Optional Steps:

  1. We then rounded the corners to give it a little extra “something”.  It actually went fairly quickly.  
  2. We also used a fun wrapping paper from Ikea to line the envelopes.  I wish I had a photo of those since they really made the invitation look much different from a “home printed invitiation”.

hometown_001

Price Breakdown:

3 invitation kit sets (found on clearance at walmart) = $27.00
2 rolls of wrapping paper for liners = $5.99  from Ikea
Color Ink for Printer (already had from previous project) = FREE
Stamps for 120 invitiations = $56.40
======================================
TOTAL $ 89.39 for 120 invites so $0.75 per invite 🙂

I lucked out and found them at WalMart on clearance thanks to the wonderful Weddingbee boards, but now I read that you could find them even cheaper at your local BigLots.  I think they turned out really cute…especially given we spent $0.74 per invite!

DIY – Wedding Menus

While menus weren’t a must have for our wedding, I think having them gave the table-scape a little “something, something” tied in with the napkins.  Plus since we did a buffet it gave everyone an idea of what to expect when their table was dismissed to be served.  I created our menu template using good ole Microsoft Word with Feel Script font (but used a free substitute on the templates below).  Other than cutting the paper they were one of the easiest DIY projects I completed for the wedding.

Blue Napkins
(photo by Climie+Co, name blurring my me)

Tools Needed:

Supplies Needed:

  • 8.5 x 11 inches Ivory or White Cardstock – 1 sheet makes 3 menus  (I used cover stock from PaperSource in Luxe White but Cold Press watercolor paper would work well also)

Instructions:

  • If you don’t already have it loaded on your computer, download and install the font of your choice.  This project uses Copperplate Gothic (which came with MS Word) and Monterey-BT.
  • Download the Menu Template from above and update to your menu items of choice.    Verify that the paper size is set to a custom size with a width of 3.66 inches and a height of 8.5 inches.
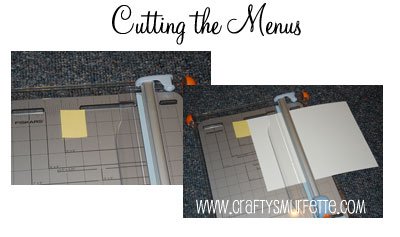
  • Cut your standard sized paper into 3 menu sized pieces*.  Each menu is setup to be 3.66 inches wide, so a 1/3 of a standard sheet of paper’s width if in landscape mode.  Using your paper cutter cut each sheet into 3 equal pieces.  To make this process less tedious I constructed a “guard” of sorts using a post-it note placed in the correct cutting position.  Then I could just line my paper up against it’s edge and make a consistent sized cut each time.  In retrospect it would have been even easier if I’d used a piece of heavier cardstock taped to my cutting deck so I have more of a solid edge to line up against.  With my cutter and this easier method of alignment, I could easily cut through 2 pieces of coverstock at a time.

  • Load the menu paper into your printer and print only 2 or 3 menus to start with to ensure everything is working correctly.
  • Print your menus out in smaller sized groups to verify consistency in the printer feed. I did groups of 20 which worked well with my HP Deskjet D4160.

  • Have a glass to wine to celebrate a quick and painless DIY project.
  • Be sure to take a photo of the finished product and email it to me!  I love detail photos!!

*Because my printer works well with custom sized paper I cut my paper into the correct menu sized pieces before printing.  This meant not having to use a more time consuming program like Adobe Illustrator to create cut marks and spaces between each menu to allow for cutting, etc.  It also meant that once the printing was finished so were the menus.  I would suggest cutting a regular piece of copy paper into the correct size and verify your printer can handle the custom size before precutting all your paper.

**If you have hundreds of menus to create you could easily take your paper to Kinko’s or some similar place to have it precut.  You would need to pay for 2 cuts, so typically less than $4.00.