So, a while back I revealed the first of my vendor thank you gifts…the frilley functional apron for our florist/DOC. Today, I’ll walk you through a quick tutorial on the top portion to help get you started making your own. The trick to making this a quick project was to once again go the semi-DIY route.
Supplies Needed:
-
PreMade apron, I used a plain white one from the re-do line at Target.
-
1 Package of 1/2 in quilt binding
-
1.5 yards of 4 inch eyelet
-
.5 yard of fabric for ruffles (mine was 44 inches wide)
-
matching machine thread to make and attach ruffles
-
embroidery thread for monogram
-
Felt for flowers or flower leaves (1 piece per 2 flower and 6 leaves)
-
1 snap set for each flower to attach (only if you want to be able to switch them out)
Tools Needed:
-
Sewing Machine
-
Embroidery Needle
-
Hand Sewing Needle
-
Heat transfer pencil
-
iron & ironing board
-
straight pins
-
rotary cutting blade & cutting mat
Instructions:
Before I started doing anything to the apron my first step was to wash & dry it. This took out the sizing and made it a bit softer and easier to work with. It also made it all wrinkly, which made it a bit more shabby chic since that was the look I was going for. Then I started work on the monogram on the bib of the apron, since I knew this hand sewing piece would take the longest.
Hand Embroidery Setup & Directions:

-
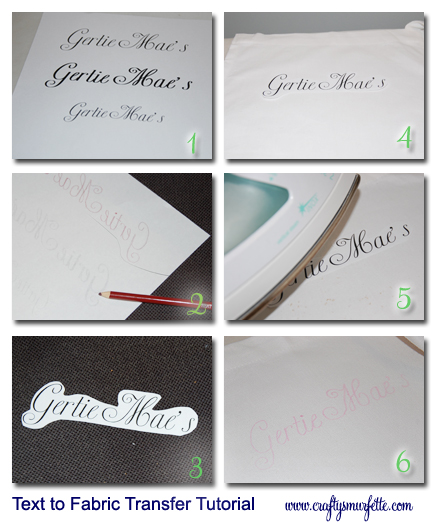
Setup your text in the word processor of your choosing and print them out on standard printer paper.
-
Flip the paper over and using your iron-on transfer pencil trace over the text. To make this process easier I used a light box, if you don’t have one visit Weddingbee’s Mrs. Stiletto to learn how to make your own. (hint before I owned a real light box I have been known to place a clip lamp under an old glass-topped coffee table).
-
Cut out around your text for easier placement on your apron (or other fabric item).
-
Carefully pre-iron your apron top and leaving the apron on the ironing board, place your template, printer side up on your fabric.
-
Iron over the paper, careful not to move or wrinkle it. I use a high heat seating with no steam.
-
Let cool for a few minutes, and then carefully remove the paper revealing your text template on your apron. Now you are ready to start sewing!
-
Using embroidery thread stitch over your letters to complete your monogram or phrase. I used a simple outline stitch but a chain stitch would also work well (use the links to view tutorial videos). I did this while watching NFL football games with the hubs.
Making Ruffles:
Since the eyelet was purchased pre-ruffled that meant I would only need two more rows of complimenting ruffles. For this project I used leftover fabric from our wedding cake table, but provided your fabric is wide enough you can easily get 3 ruffles per each 1/2 yard.
-
First measure the width of your apron bottom and multiply by 1.5 (or 2 if you want really ruffly ruffles) and cut the fabric section into that width.
-
To make cutting easier I first ironed my fabric, folded it in half lengthwise and pressed it again.
-
Using the rotary cutter and cutting mat I cut 2 strips of fabric that was 4 inches in height.
-
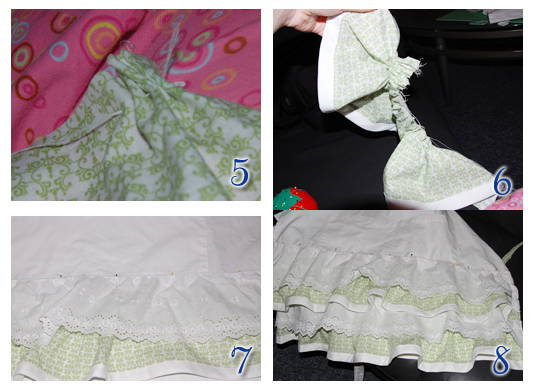
Take out your quilt binding and cut it into strips the same width as your fabric. Cut one piece of binding per each fabric strip and sew to bottom edge of what will become ruffle.

-
Pull threads to make fabric ruffle, and spread out to be the width of your apron
-
Pin in place
-
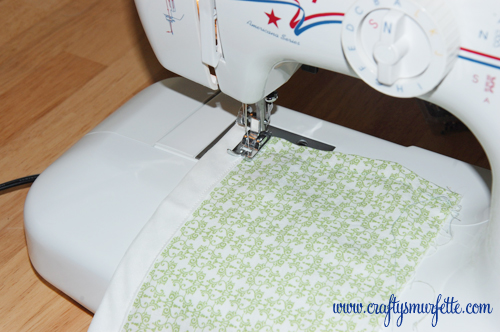
Using sewing machine, sew ruffle into place
-
repeat with remaining eyelet and ruffles


