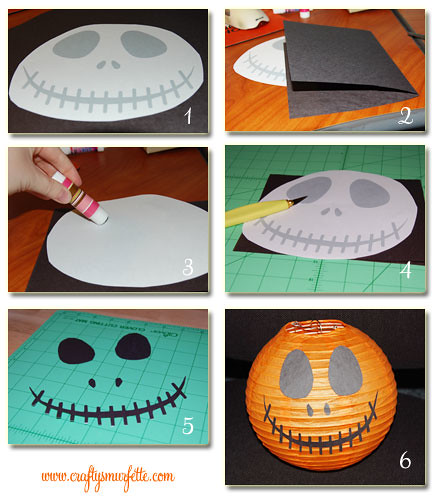
While Halloween typically isn’t a big holiday in the Smurfy household, this year will be a little bit different. We’ve been recruited by a family member to help out at their historic district home since they have over 200 kids visit, and to bring any decorations we might have. Since we didn’t have decorations other than some orange string lights (from football season), I decided to try to whip a few up. I think these little guys turned out quite well, and really like that I can use them again!

Supplies Needed:
- paper lanterns
- battery operated tea lights (1 or 2 per lantern)
- black construction paper
- glue stick
- double sided tape or white glue
Tools Needed:
- Scissors
- Computer & printer
- Template of choice
- Template for pumpkin faces: http://www.dltk-holidays.com/Halloween/mpatterns.htm
- Template for ghost outline: MS Word Clipart
Pumpkin Lanterns:

- Print out your jack-o-lantern template, careful to trim around as much as possible.
- Fold construction paper in half so you can cut two faces at once.
- Use a washable glue stick in a few places on the back of the template to help hold it in place while you cut.
- Carefully cut out your face with a craft knife and carefully separate the pieces from the template. (Hint: Save the cut-out templates and left over black paper and use this for carving your real jack-o-lanterns!)

- Using double sided tape or white school glue attach your face to the assembled lantern.
- Add battery operated tea lights. I usually drop the tea lights in a sandwich bag and just drop them into the lantern. The sandwich bag keeps it from falling out the bottom. If you want them brighter you can always use 2 tea lights per lantern.
- Hang and enjoy!!
Ghost Lanterns:

- Print out your ghost template, careful to trim around as much as possible.
- Fold construction paper in half so you can cut two faces at once. In this case since I wanted to cut out three, I added an additional piece in the middle of the stack.
- Use a washable glue stick in a few places on the back of the template to help hold it in place while you cut.
- Carefully cut out your jack-o-lantern face with a craft knife and carefully separate the pieces from the template.
- Using double sided tape or white school glue attach your face to the assembled lantern.
- Add battery operated tea lights. I usually drop the tea lights in a sandwich bag and just drop them into the lantern. The sandwich bag keeps it from falling out the bottom. If you want them brighter you can always use 2 tea lights per lantern.
- Hang and enjoy!!
Reuse Information:
The great thing about using double-sided tape is that I am able to simply pop the cutouts off the lantern when we take them down (carefully as to not rip the paper lantern itself). This means I can take the lanterns apart and store them to use again next year or use the plain orange & white lanterns for another party.

Cost Breakdown:
We already had most of the tools necessary for this quick Halloween decoration, so I just needed to pick up a couple of supplies. I only made two stops, Michael’s where I had a 20% entire purchase coupon and the local dollar store, Dollar Tree. If you don’t already have construction paper and glue you can easily pick those up at the Dollar Tree as well. I refer to my local dollar store as my “small craft store”.
– White Lanterns: $1.00 each with 40% total purchase coupon at Michael’s
– Orange Lanterns: $1.50 each minus 40% fall decor sale at Michael’s
– Battery Operated Tea Lights: $1.00 for package of 2 at Dollar Tree
————————————————————————————————–
Total for 6 Lanterns (including tax): $8.02 or $1.33 each

OMG, lady, I love these. So fun. Maybe I might make some this weekend. ATL crafting, what whaaat. (That is if I don’t get pummeled by the storm coming in while I drive up 85 tomorrow afternoon).
This are super adorable! I SO want to do this when we can host a Halloween party! Girl I love your projects! 😀