DIY: Fall Sunflower Cupcake Wraps for $1

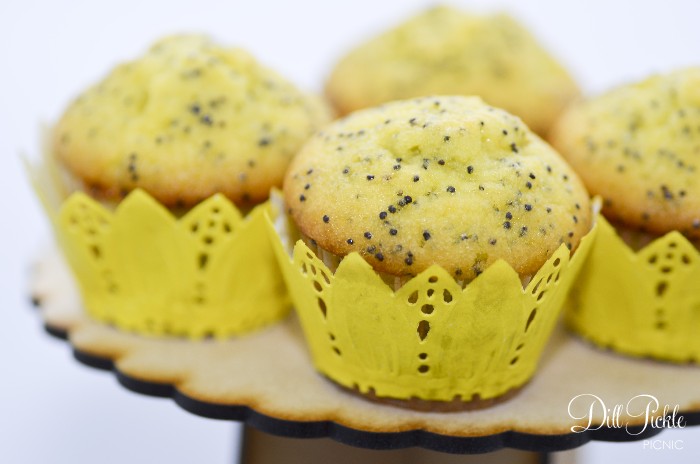
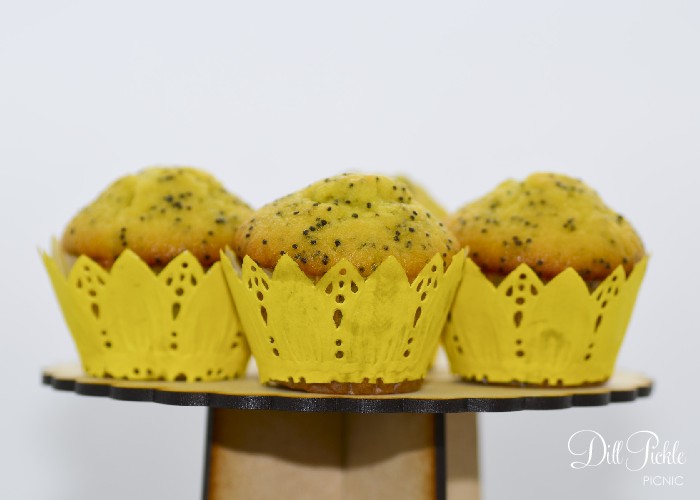
There is something about the cooler temperatures of fall that make me think of sunflowers and jewel tone colors.  Maybe it’s all the colors that nature surrounds us with this time of year.  So when I found these fun little yellow sunflower doilies at my local Dollar Tree, I dropped them in my cart not really knowing what I would do with them.  A few weeks later I needed to take muffins & mini muffins to a gathering and decided it was the perfect time to give those little doilies a new home.

Sunflower Muffin Wraps from Dill Pickle Picnic
This is the part where I admit this all happened last fall…but as I was running through the Dollar Tree in search of clear treat bags last week I once again saw these packages of cute little sunflower doilies and made a note to finally put this post together.  These are the types of craft projects I really enjoy….quick, easy, and quite a bit of fun for the buck.

It’s easy to make your own sunflower muffin or cupcake wraps:
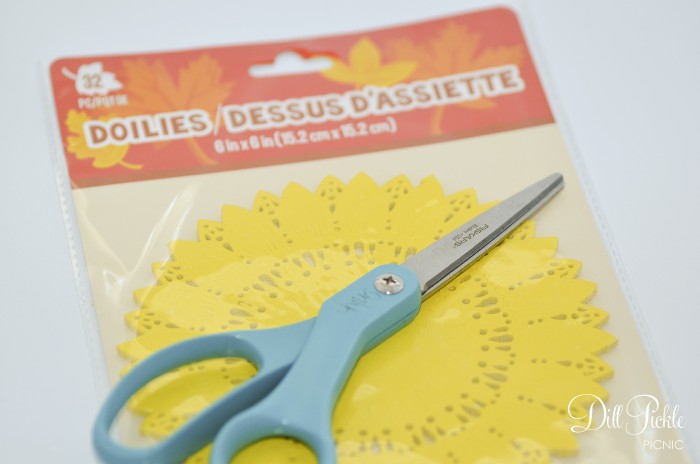
DPP-Fall-2013-01

Supplies Needed:  

  • Package of Sunflower (or any rounded shape doilies)
  • Scissors
  • Ruler
  • Clear Tape

To Make Mini Size Muffin Wraps:

  1. Fold your doily in half
  2. Measure down from the outside 1.25 inches in several places and make a slight mark.
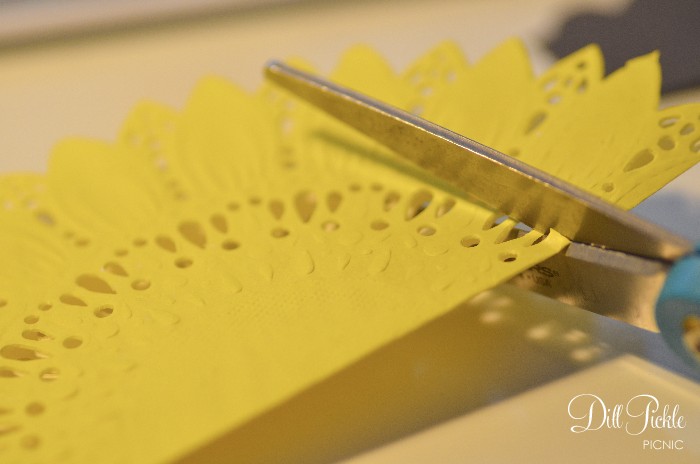
  3. Cut along the marked lines with your scissors.  On the sunflower doilies it was easy since the 1.25 inch mark ended up being in line with one of the rows of cutouts, so I could just cut along that row of details without needing to measure all the way across.
    DPP-Fall-2013-03
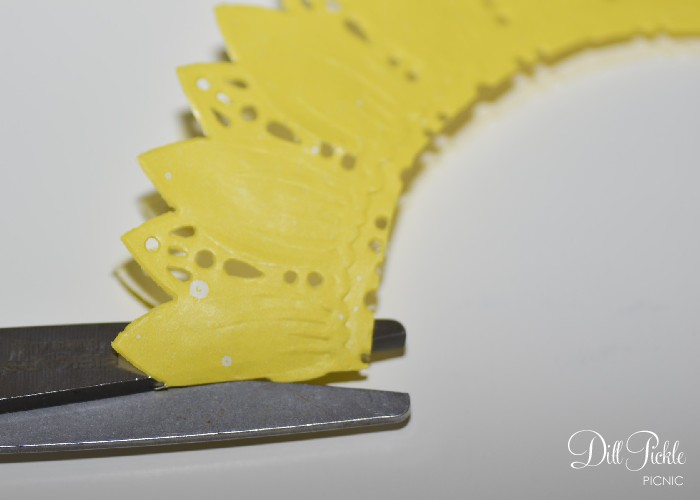
  4. Cut the doilies along the folded lines on both ends.
    DPP-Fall-2013-05

To Make Standard or Jumbo Size Cupcake Wraps:

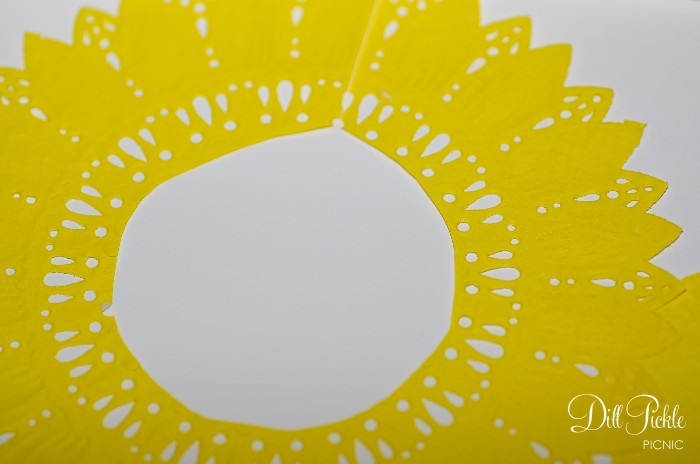
  1. Lay your doilies out flat.
  2. Measure down from the outside 1.75 inches for standard or 2.5 inches for jumbo from the outer edge and make a slight mark. Do this around the entire circle.
  3. Using your scissors make a straight cut from the outside to the marked location for one of your marks.
    DPP-Fall-2013-06
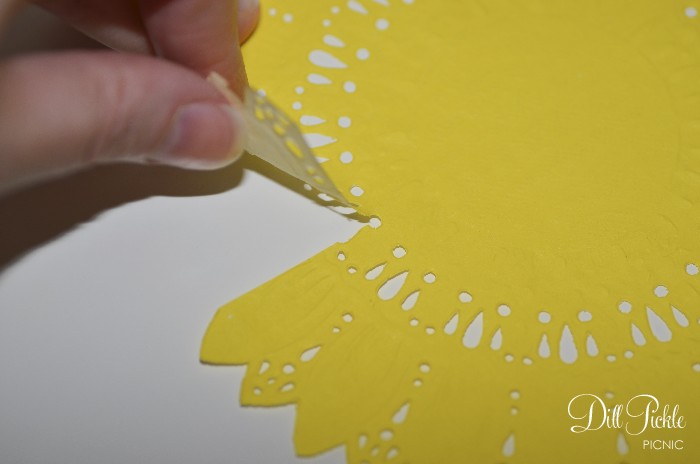
  4. Cut along the marked lines with your scissors.  On the sunflower doilies it was easy since the 1.75 inch mark ended up being in line with one of the rows of cutouts, so I could just cut along that row of details without needing to measure all the way across.
    DPP-Fall-2013-07
  5. Wrap around the base of your cupcake/muffin and cut to size using a small piece of clear tape to adhere them together in the back.
  6. Serve & Enjoy!

With these smaller sunflower size doilies I was able to make 2 mini wraps per doily or 1 standard or jumbo wrap. Which means for $1.07 I could make 64 mini wraps or 32 standard or jumbo wraps.  I call that a fabulous fall deal 🙂

DPP-Fall-2013-08

What does fall make you think of?  Do you look for quick ways dress up your fall treats?  If so, please share….I’d love to hear how you quickly add a little fall to your goodies!

DIY: Easter Napkin Wrap Round-Up

Since Easter is just around the corner, I decided to create a one-stop post featuring all my previous year’s related napkin wraps!  Also, I’ll be adding links to the new ones I plan to post here later this week.  To access the post with printable template simply click on the napkin wrap images below:

All templates above use Monterey BT font which is free to download from SoFontes.  New to Napkin Wraps?  No worries, visit this post for step-by-step instructions on how to use my napkin wrap templates!

DIY: Are you ready for some football…straws?

Today I would like to dedicate some craftiness to one of my all-time favorite fall activities…football!  While I tend to gravitate towards college football, this craft could just as easily apply for the pros.  Regardless of what your favorite tailgate beverage might be, I can assure you it will look much more festive when sipped casually through one of these cuties. 😉

DPPhelmetstraw3
Ready to make some of your very own?

Supplies Needed:

  • Cardstock in your favorite team’s colors
  • Straws, also in your favorite team’s colors
  • Glue or Glue Stick
  • Helmet Punch (or die cuts from your favorite machine, you will need two helmets for each straw)

DPPhelmetstraw9

Instructions:

  1. Punch out your helmets.  For this version of this process I used my Silhouette to quickly cut out my helmets using some cardstock I had left over from another project.   You will need two helmets for each straw you want to make.
  2. Using your glue cover the back of one helmet. I use a glue stick when I want to whip these up really quickly, but choose to use paper glue for the ones I sell in my store).
  3. DPPhelmetstraw10

  4. Carefully layer the second helmet onto the first, taking care to line up the edges all the way around. Make sure you press to seal the pieces together around the straw.DPPhelmetstraw11
  5. DPPhelmetstraw12

  6. Repeat for the remainder of your straws

Wouldn’t these look fun for a sport themed birthday party as well?

DPPhelmetstraw13

Total Cost: $1 and up

See quick, easy…and cute! Will you decorate for your tailgate area this year? Can you guess who my team of choice is based on these colors?

War Eagle!

Like these but have no time to make your own?
Check out my shop and message me about creating a set custom for you!

DIY: Pumpkin Ale Labels

One last project going on in our household this week is the labeling of my hubby’s home-brewed pumpkin ale.  However these fun labels could look fun over your favorite pumpkin brew or any other fun Halloween beverage.  This could even be fun for other fall festivities or Thanksgiving.

Pumpkin Ale Labels
I printed these out on standard paper and then ran them through my Xyron machine, so these labels won’t stand-up to being iced down.  Then I setup a cut file on my Silhouette (which I’m still learning how to use) and cut them out.  The labels were quickly thrown together, but overall I’m happy with how they turned out.

Don’t have all the fun toys above?  That’s ok too!  You can easily make your own by downloading the printable PDF from below and printing it out onto full sheets of labels and then trimming around them!

Click to Download Printable PDF

Pumpkin Ale Labels

Now that the pumpkin ale labels are finally all attached and ready for a Halloween party this weekend…it’s time to start thinking about fun ideas for the Holiday Ale coming up next!

I hope each of you has a safe & spooky weekend, Happy Halloween Y’all!!

DIY: Batty Cupcake & Food Flags

Well hello there! I’ve missed you guys while I’ve been toiling away on a huge work project that I wish I was able to share. It ended up being almost 100% DIY and has really tested my abilities to be both crafty, economical, and yet still extremely professional. Now I’m creatively tired. Does that make sense?

So, today lets talk about Halloween and how bats can be cute.
DPPbatstraw17Ready to make some of your very own?

Supplies Needed:

  • Black Paper or Cardstock
  • Glue or Glue Stick
  • Toothpicks
  • Bat Punch (or die cuts from your favorite machine)

DPPbatpicks-1

Instructions:

  1. Punch out your bats. I used a punch I picked up at JoAnn’s with a 50% off coupon. You could also cut them using your favorite die cut machine. You will need two bats for each flag you want to make. (Hint: with this punch I could get roughly 20 individual bats from one 8.5×11 piece of cardstock).DPPbatpicks-2
  2. Using your glue cover the back of one bat. I use a glue stick when I want to whip these up really quickly, but choose to use paper glue for the ones I sell in my store).DPPbatpicks-4
  3. Place your toothpick on the glued bat.
  4. DPPbatpicks-5

  5. Carefully layer the second bat onto the first, taking care to line up the edges all the way around. Make sure you press to seal the pieces together around the toothpick.
  6. DPPbatpicks-6

  7. Repeat & Add to Cupcakes or Other Spooky Snacks
  8. DPPbatstraw15

Want to jazz up your Halloween party a bit more? Repeat this process using straws to use when you serve up your “witches brew”.

DPPbatstraw3

Total Cost: $1 and up

See quick, easy…and cute! How will you decorate for your Halloween festivities this year? And, after you finish a big DIY project do you too find yourself creatively fried?

(Like these but have no time to make your own? Check out my shop for limited quantities available for sale!)


DIY – Save the Dates – The Reveal

After a few hours fighting with Adobe InDesign and Photoshop to get the look I wanted, I started dropping graphics and text into a post card template I had created in InDesign.  I create two documents; one for the front of the cards and another set to landscape for the backs.  I then created a 3rd document with the accommodations instructions that the wedding party would receive in addition to the Save the Date cards.

By this time I was running out of time, and patience so I saved both files as PDF files.  We ran these down to the local big Office Supply store and had them printed on heavy ivory cardstock which gave them a bit “older” look.  While these were being completed for us, I ran home and printed out the accommodations cards on some gray cardstock, cut the page into 4 cards and rounded the corners to make them look a bit more finished.  We used corresponding gray Paper-Source envelopes which I lined with Amy Butler print scrapbook paper.  Printing and cutting were our biggest expense but the whole project for 100 cards cost around $65 (including postage).  They were pretty far from where we started, but we were both happy with how they turned out.

STD_001

STD_002

STD_003

STD_004

I didn’t create detailed instructions because I wasn’t sure anyone would be interested.  I will be glad to email you the InDesign template, or answer any other questions about creating DIY postcards if you send me a message.

Inspiration Folder – Save the Dates

When we started thinking about Save the Dates (STD’s) we weren’t really sure we needed them.  After all our venue was an hour from our house…so really wasn’t the invite and wedsite enough?  However it was also cross country for some of our guests and even across “the pond” from other, that meant that our guests might need more time to plan to join us than we had originally thought.  So what’s a girl to do in that situation…google “DIY save the dates” of course.

We realized that we both gravitated to vintage looking postcards that would give the date and our wedding website.  That decided the next catch was where to find them.  The first place I turned was my crafty friend etsy!

I really liked this one…but I agree it’s not quite “vintage”

STD_001(source)

I also liked this one….again not exactly vintage looking

STD_002(source)

And there was this one…not a postcard at all….but we loved the simple style.  Do you notice we are drifting from our original idea.

custom+save+the+date+card_02

custom+save+the+date+card_01
(source)

Then we saw these thank you cards courtesy of Martha…they were really, really close.

thankyouidea(source)

Then all of a sudden….there they were.  B & I were on the same wavelength, this was it.  Even the date on the photo was our wedding date…it was meant to be.  The birds sang and all the world was happy.

STD_003STD_004(Source)

….until I read the pricing/timelines.  They weren’t out of the budget but by the time we decided we liked them it was already a week past the date they “should” have gone into the mail.  The future-hubby wondered why I didn’t just do them myself since that’s what we had originally talked about.  I knew there was no way I could recreate these beauties, so I decided to cut my losses and just attempt something with the vintage look of the text on the back of the card.

That would be simple right?