DIY: Easter Napkin Wraps – Part II

Today we have Easter baskets & banners, as well as a new idea for how to use the napkin wraps.  Lets start out with a cute Easter basket wrap:

To download: Easter Basket Napkin Template

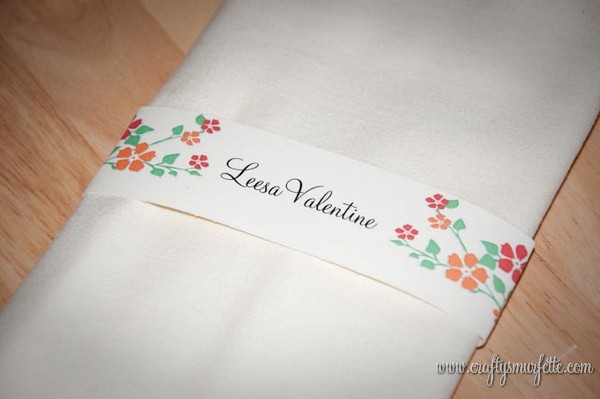
Next up, a cute Easter banner template that can be used as either a standard napkin wrap, OR just cut and lay it across your place-settings as a quick & simple name card.  These would also but cute if cut on the ends to duplicate the banner shape (I just thought of that as I was posting the photos).


Download: Easter Banner Napkin template

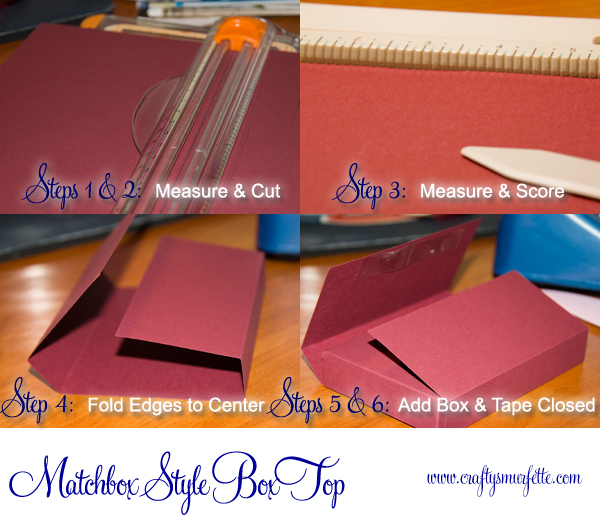
All templates use Monterey BT font which is free to download from a link on the templates page.  New to Napkin Wraps?  No worries, visit this post for step-by-step instructions on how to use my napkin wrap templates!

_________________________________________________________________________

In other news, we started the great craft room/office/spare bedroom relocation process.  It will be amazing to have a much brighter, larger space to use for my crafty fun and office but I dread the process since it involves painting and new flooring.  Any suggestions on how to organize all my craft supplies once I’m able to unpack them?

DIY: Easter Napkin Wraps – Part I

I realized this week that Easter is just around the corner.  It seems that this year is just speeding by and I’m left wondering where did the first quarter of 2010 go?  Sadly, the job that pays the bills has been demanding most of my nightly internet time and I missed St. Patrick’s Day completely…but I am determined to whip together a few last-minute Easter decorations this week.  Starting with napkin wraps!

This post is about more casual napkin wraps, with bunnies.  Up next will be a post with Easter baskets & banners.  Later this week I’ll post a few more religious themed wraps I put together for a friend to use at a church event.  It going to be a Napkin Wrap fest this week in the Smurfy household 🙂

Let’s kick this off with the cutest little brown bunny.  He’s so cute I want to hug him 😉


Download template: Brown Bunny Napkin Wrap Template

And a more vintage looking bunny:

Download: Vintage Bunny Wrap Template

A finally, a parade of bunnies!

Download: Bunny Parade Wrap Template

All templates use the Monterey BT font which is free to download from Sofontes (see link on templates page).  New to Napkin Wraps?  No worries, visit this post for step-by-step instructions on how to use my napkin wrap templates!

DIY: Large Matchbox Candy Boxes

Yesterday I showed off a few of the candy box Valentines I handed out this year.  I think they turned out far better than I expected and I have a few ideas up my sleeve for ways to use them in the future.  Today…I’ll go through how to make your own!  Warning:  this is a photo heavy post because I think it makes it a bit easier to follow along with the process.

Tools Needed:

  • Cutting Device of Choice (Scissors work great, and I used a cutting board and craft knife)
  • Ruler
  • Bone Folder or Scoring Pad (I used my new Martha Scoring board look for a review coming soon).

Supplies Needed:

Instructions:
Creating the Box Bottom (instructions below photo)

  1. Print out the template for the box bottom and cut it out with scissors.  If you plan to make several boxes it might be easier to go ahead and trace the template on a sheet of stencil plastic before cutting it out so you have a sturdier template.
  2. Lay the box bottom template down on the long edge of your sheet of paper and align it to the left or right edge to decrease the number of cuts you’ll make later.
  3. Cut out your box bottom along the blue lines on the template (this will be the outside edges and then an extra inside cut on each side to create the side flaps.
  4. Now it’s time to score the sides.  Using your template’s green lines faintly mark the lines to be scored on the inside of your box bottom.
  5. Carefully score the box from the inside (this only matters if your paper is different on the flip side) using a bone folder or scoring board.  I typically use a ScorPal, but picked up the new Martha one at Michael’s recently and decided to give it a spin).
  6. Now it’s time to fold! Turn your box so that it is laying horizontally on your table, and start by folding the left and ride sides down.  Feel free to add a piece of double-sided tape inside the center of the fold if you want to make the box a bit more sturdy.
  7. Now on the same pieces fold the sides to create the flaps (these will be created by the internal cuts you made earlier).
  8. Fold the outside edge of both horizontal sides of the box toward the center (do not tape).  Repeat by folding it over again towards the center (again not taping).
  9. Open up the folds, and place a piece of double-sided tape on the inside of the outside fold, and make sure that the side flaps are “down”.  The left and right sides of the box should form a bracket shape on both sides.
  10. Carefully fold the horizontal side of the box flap over the flaps and press down on the inside of the box to seal the tape.
  11. Repeat for other side of the box… and you are finished with the box bottom!

Creating the Box Top (instructions below photo):

  1. This is the easy part, no template required (but feel free to make one if it makes it easier on you)!  Take out the sheet of paper leftover from cutting out the box bottom.
  2. Using the 8.5 inch edge you didn’t cut from before measure up 4 3/8 inches and cut straight across creating a rectangle that is 4 3/8 inches by 8.5 inches.
  3. Lay the paper out horizontally and again using your ruler & scoring tool score the rectangle from top to bottom vertically in the following increments (from left to right).  This is where the Martha score board was a wonderful addition, I didn’t have to mark out the scores since the ruler is built right in!  Note:  All measurements are in inches and measured from left to right from the edge of the page.
    1. 2 inches
    2. 2 3/4 inches
    3. 5 3/4 inches
    4. 6 1/2 inches
  4. Carefully fold all scores upwards toward the center of the page.
  5. Insert the box bottom with the open side down
  6. Carefully fold top around the bottom and secure with a piece of double-sided tape.
  7. You now have a box perfectly sized to hold 8 Hershey’s Nuggets (or a gift card perhaps).

(Click here to see more Valentines Boxes)

Now…how will YOU decorate your candy box?

Weddingbee Valentines Swap 2010

Last year the day before Valentines I saw this adorable template for making a larger matchbox style paper box with matching candy wrappers to fill up the inside with.  I quickly downloaded it, printed it out…and hit a roadblock.  No matter what I did with the settings it was either too small or too large and I deleted it and gave up.  (sidebar:  I honestly don’t remember where I found it last year since I didn’t save it and I’m also quite positive the problems were with our old printer).  So this year I wanted to do something similar to send my swap partners for the WB Valentine’s Swap…so I sat down with some scrap paper, a ruler, and a pencil.  It took an hour or so…but I ended up with a box template that would hold 8 Hershey’s nuggets.  

I went to work decorating the boxes and their chocolate cargo…and I think they turned out quite cute!  Each includes a Shrinkey Dink magnet on the front with a familiar little bee for them to keep to remember their fun ‘bee times with for years to come.  I hope they like them half as much as I enjoyed making them! 🙂

PS.  I’ll be posting the templates & instructions for how to make your own matchbox style boxes later tonight 🙂

DIY: Valentine Themed Napkin Wraps

It’s that time of the year again…Valentines Day is approaching.  Want to know a secret? shh..but up until the past few years I have avoided Valentines Day like the plague.  I have valid reasons….bad things happen to me on that day.  For example one year I managed to knock myself out while attempting to pick up an earring back.  However, I have a man who was determined to at least make me acknowledge the date, so here we are.  Two years later…and I’m making Valentines Day crafts! So you should thank my Brainy hubby for the cuteness you see below 🙂

Take a closer look… isn’t this little birdy I found in good ‘ole MSClipArt just adorable?

Click to download template:  csmurfnap_valbird

New to Napkin Wraps?  No worries, visit this post for step-by-step instructions on how to use my napkin wrap templates!

So, what about you?  What crafty fun do you have in store for Valentines Day? or is it possible anyone else out there has Valentines Day horror stories to share? 😉

DIY: Holiday Napkin Wraps – Part II

And now time for the “tree edition” of the napkin wraps.  Again, these work the same as my previous wraps, refer to this post for complete instructions.  Merry Christmas from our Smurfy house to yours!

The first is a Set of Multi-Colored Trees
Click to download: csmurf_treenapkins

Or how about my favorite with green & blue trees
click to download template:  csmurf_greenbluetreenapkins

and finally a winter wonderland with pale blue trees
click to download template:  csmurf_palebluetreesnapkins

Check back tomorrow for my final Christmas project for this year:  My version of these 🙂

DIY: Holiday Napkins Wraps – Part I

Ever had that moment when you know you’ve already created something and just can’t find it.  That was me with the Holiday Napkin wraps…I created and tested them weeks ago and then promptly lost the files.  Thankfully today I found them, and not a moment too soon! These work the same as my previous wraps, refer to this post for complete instructions.  Merry Christmas!!

The first is a sepia toned winter cottage.
Click to download: csmurf_rustichousenapkins

Or how about some pastel ornaments
click to download template:  csmurf_pastelornamentnapkins

Check back tomorrow for the “tree” edition of Holiday Napkin wraps & hope you and yours have a wonderful Christmas!

Die-Cut Christmas: Food Buffet Labels

I’ve dubbed this Christmas season in our home as the “Die-Cut Christmas” because I plan to make several projects using both my Cuttlebug for die-cuts and paper punches.  First there was the Christmas Card Addresses, then the place cards and I liked how they turned out so I moved onto today’s project:  Buffet Labels.

Editor’s Note: These will actually get quite a bit of use during the holidays with not one but Christmas potluck lunches, and I’m so excited to see them in all their glory!

Materials Needed:

  • White or Ivory Text Weight Paper
  • Small pieces of Heavy weight card stock or even recycled cardboard
  • Green Cardstock or Construction paper (it’s ok to reuse envelopes, etc.)
  • Red Paper (it’s ok to reuse envelopes, etc.)
  • Glue Stick or pen

Tools  Needed:

  • Top Note Die from Stampin Up
  • Die Cutting Machine (I use a Cuttlebug)
  • Sizzix Festive Christmas Set (purchased 50% off at Joann’s)
  • Standard Hole Punch
  • Scissors or Paper Cutter
  • Computer with Word Processing Software of your choice
  • Home Printer

Getting the pieces punched out:

  1. Cut your paper.  I cut my paper ahead of time so it is easier to center it on the die cut.  Since I am using regular 8.5 x 11 paper, I simply cut my paper into fourths.  For this project I used my paper-cutter because it has the outlines for this size paper on the board so I just line it up and cut.  Each piece of paper should end up 4.25 x 5.5 inches.
  2. Setup your document in your word processing software.  I use MS Word, so I just create a new document and then set the page size to be the 4.25 x 5.5 inches of my pre-cut paper.  Then I center the document and choose my font/size of choice.  For this project I used Monterey BT which you can download for free (see my templates page for a link). This is where you could get really fancy and use the mail merge feature of MS Word to fill in from a spreadsheet, it’s a great time saver but is a bit tricky to setup…or you could just cut and paste in each one like I did.
  3. Print out your individual buffet labels.
  4. Start die cutting.  Using the Top Note Die face up in your machine, carefully center the printed page in the center of the surface.  Run through the machine.  Repeat for each printed page.
  5. Continue die cutting.  Now take out your green paper and the holly die and start working on cutting out your leaves.  A large holly shaped paper punch would also work well for this if you have one!  You’ll need 2 holly leaves per buffet label.  Note that I didn’t use whole pieces of paper when I cut out my leaves…I had some scrap paper from the edges of some green top notes I cut out earlier so I just used the scrap paper to line up over my leaves.  This is a great usage for scraps or even perhaps those envelopes from the Christmas cards you’ve already received!
  6. Punch out your berries.  Now the Holly Die comes with a berry if you’d like a single red berry…but I liked the smaller berries so I went with a standard hole punch.  You’ll need 3 to 4 berries per buffet label.  Again this is a great place to reuse paper…you can see I used the cover of an old PaperSource catalog that was in my recycle bin.

Putting it all together:

  1. Start with the Leaves.  Using a piece of plastic or paper, take the glue stick and cover the back of 2 of the holly leaves so the portions of the leaves that will attach to the buffet label are covered.
  2. Carefully lift them from the backing and place onto label (I found it easier to start with the lower leaf in the bottom left corner and then add the upper one afterwards).  To remove the leaf from the backing I was able to use my fingernail, however tweezers would also work well for this.
  3. Add the berries.  Using a glue stick repeat the step above for the berries, this is the most tedious step.  I think a glue pen or even school glue might have worked more quickly for this step.
  4. Cut a small piece of heavy cardstock or recycled cardboard (think cereal boxes) approx 1 inch by 3.5 inches per buffet label.
  5. Fold the first third of the cardboard strip forwards and align on the back of the label, holding in place with a glue stick or even tape.
  6. Stand it in front of your tasty dishes and let them tell the world that your cobbler is made of blackberries 😉

If you like these, you might also like the other entries in my Die-Cut Christmas Series:
Die-Cut Christmas Card Addresses
– Die-Cut Seating Cards
– Die-Cut Food Buffet Labels

Die-Cut Christmas – Seating Cards

I’ve dubbed this Christmas season in our home as the “Die-Cut Christmas” because I plan to make several projects using both my Cuttlebug for die-cuts and paper punches.  First there was the Christmas Card Addresses, and I liked how they turned out so I moved onto today’s project:  Seating Cards

Editor’s Note:  Here is where I should be totally honest and fess up that my family will in no shape or form use this for our Christmas lunch or dinner…but I can dream right?

Materials Needed:

  • White or Ivory Text Weight Paper
  • Green Cardstock or Construction paper (it’s ok to reuse envelopes, etc.)
  • Red Paper (it’s ok to reuse envelopes, etc.)
  • Glue Stick or pen

Tools  Needed:

  • Top Note Die from Stampin Up
  • Die Cutting Machine (I use a Cuttlebug)
  • Sizzix Festive Christmas Set (purchased 50% off at Joann’s)
  • Standard Hole Punch
  • Scissors or Paper Cutter
  • Computer with Word Processing Software of your choice
  • Home Printer

Getting the pieces punched out:

  1. Cut your paper.  I cut my paper ahead of time so it is easier to center it on the die cut.  Since I am using regular 8.5 x 11 paper, I simply cut my paper into fourths.  For this project I used my paper-cutter because it has the outlines for this size paper on the board so I just line it up and cut.  Each piece of paper should end up 4.25 x 5.5 inches.
  2. Setup your document in your word processing software.  I use MS Word, so I just create a new document and then set the page size to be the 4.25 x 5.5 inches of my pre-cut paper.  Then I center the document and choose my font/size of choice.  For this project I used Monterey BT which you can download for free (see my templates page for a link). This is where you could get really fancy and use the mail merge feature of MS Word to fill in from a spreadsheet, it’s a great timesaver but is a bit tricky to setup…or you could just cut and paste in each one like I did.
  3. Print out your individual name plates.
  4. Start die cutting.  Using the Top Note Die face up in your machine, carefully center the printed page in the center of the surface.  Run through the machine.  Repeat for each printed page.
  5. Continue die cutting.  Now take out your green paper and the holly die and start working on cutting out your leaves.  A large holly shaped paper punch would also work well for this if you have one!  You’ll need 2 holly leaves per name plate.  Note that I didn’t use whole pieces of paper when I cut out my leaves…I had some scrap paper from the edges of some green top notes I cut out earlier so I just used the scrap paper to line up over my leaves.  This is a great usage for scraps or even perhaps those envelopes from the Christmas cards you’ve already received!
  6. Punch out your berries.  Now the Holly Die comes with a berry if you’d like a single red berry…but I liked the smaller berries so I went with a standard hole punch.  You’ll need 3 to 4 berries per name plate.  Again this is a great place to reuse paper…you can see I used the cover of an old PaperSource catalog that was in my recycle bin.

Putting it all together:

  1. Start with the Leaves.  Using a piece of plastic or paper, take the glue stick and cover the back of 2 of the holly leaves so the portions of the leaves that will attach to the name plate are covered.  Carefully lift them from the backing and place onto name plate (I found it easier to start with the lower leaf in the bottom left corner and then add the upper one afterwards).  To remove the leaf from the backing I was able to use my fingernail, however tweezers would also work well for this.
  2. Add the berries.  Using a glue stick repeat the step above for the berries, this is the most tedious step.  I think a glue pen or even school glue might have worked more quickly for this step.
  3. Admire your work and set that table!

If you like these, you might also like the other entries in my Die-Cut Christmas Series:
Die-Cut Christmas Card Addresses
– Die-Cut Seating Cards
– Die-Cut Food Buffet Labels

Die-Cut Christmas – Addressing the Cards

I’ve dubbed this Christmas season in our home as the “Die-Cut Christmas” because I plan to make several projects using both my Cuttlebug for die-cuts and paper punches.  And….it all started with this project:  Christmas Card Addresses!

Editor’s Note:  Here is where I should be totally honest and fess up that it  really all started because my spreadsheet was wrong and I addressed quite a few cards with the wrong zip code.  We didn’t have any extra red envelopes and after writing personalized messages in our cards I needed to find a “cover up”!  Then I liked the cover up better and set out to snazz-up the remainder!

Materials Needed:

  • White or Ivory Text Weight Paper
  • Green Cardstock or Construction paper (it’s ok to reuse envelopes, etc.)
  • Red Paper (it’s ok to reuse envelopes, etc.)
  • Glue Stick (or you could use a Xyron)

Tools  Needed:

  • Top Note Die from Stampin Up
  • Die Cutting Machine (I use a Cuttlebug)
  • Sizzix Festive Christmas Set (purchased 50% off at Joann’s)
  • Standard Hole Punch
  • Scissors or Paper Cutter
  • Computer with Word Processing Software of your choice
  • Home Printer

Getting the pieces punched out:

  1. Cut your paper.  I cut my paper ahead of time so it is easier to center it on the die cut.  Since I am using regular 8.5 x 11 paper, I simply cut my paper into fourths.  For this project I used my paper-cutter because it has the outlines for this size paper on the board so I just line it up and cut.  Each piece of paper should end up 4.25 x 5.5 inches.
  2. Setup your document in your word processing software.  I use MS Word, so I just create a new document and then set the page size to be the 4.25 x 5.5 inches of my pre-cut paper.  Then I center the document and choose my font/size of choice.  For this project I used Monterey BT which I was able to download for free. This is where you could get really fancy and use the mail merge feature of MS Word to fill in from a spreadsheet, it’s a great time-saver but is a bit tricky to setup…or you could just cut and paste in each one like I did.
  3. Print out your address pages.
  4. Start die cutting.  Using the Top Note Die face up in your machine, carefully center the printed page in the center of the surface.  Run through the machine.  Repeat for each printed page.  I won’t lie…this can get old if you have a lot of addresses to cut out.  I did mine in 2 batches while watching Christmas movies so it made it go much faster!
  5. Continue die cutting.  Now take out your green paper and the holly die and start working on cutting out your leaves.  A large holly shaped paper punch would also work well for this if you have one!  You’ll need 2 holly leaves per envelope.  Note that I didn’t use whole pieces of paper when I cut out my leaves…I had some scrap paper from the edges of some green top notes I cut out earlier so I just used the scrap paper to line up over my leaves.  This is a great usage for scraps or even perhaps those envelopes from the Christmas cards you’ve already received!
  6. Punch out your berries.  Now the Holly Die comes with a berry if you’d like a single red berry…but I liked the smaller berries so I went with a standard hole punch.  You’ll need 3 to 4 berries per envelope.  Again this is a great place to reuse paper…you can see I used the cover of an old Paper-Source catalog that was in my recycle bin.

Putting it all together:

  1. Start with the addresses.  Flip each of the addresses face side down and apply your glue stick to the back, making sure to cover all the edges and the center of the shape.  This is also where you could use your Xyron to speed up the process but wouldn’t you just know it mine needs a refill, so I stuck with the readily available glue stick.
  2. Quickly and carefully apply the address to the center of your envelope and press around all the edges and center to ensure it is firmly in place!
  3. Add the Leaves.  Using a piece of plastic or paper, take the glue stick and cover the back of 2 of the holly leaves so that all edges are covered.  Carefully lift them from the backing and place onto envelope (I found it easier to start with the lower leaf in the bottom left corner and then add the upper one afterward).  To remove the leaf from the backing I was able to use my fingernail, however tweezers would also work well for this.
  4. Add the berries.  Using a glue stick repeat the step above for the berries, this is the most tedious step.  I think a glue pen or even school glue might have worked more quickly for this step.
  5. Admire your work and send!

If you like these, you might also like the other entries in my Die-Cut Christmas Series:
Die-Cut Christmas Card Addresses
– Die-Cut Seating Cards
– Die-Cut Food Buffet Labels