**Have you ever watched Semi-Homemade by Sandra Lee? I think my crafting style is very much like her cooking style, especially during all the chaos of the wedding planning. I like to find things that can be purchased and then “customized” to be more personal. These projects tend to be much quicker than all out DIY and I’ve dubbed these projects as Semi-DIY.**
It has amazed me how many thank you notes we have gone through in the past year. I started trying to add it all up and when the number went past 200 I stopped! Part of that I’m sure is that I’m from the southern school of etiquette that says a hand-written thank you note should follow any gift or act of kindness, and I’m perfectly “ok” with that. I know I love knowing people appreciate the little things so I’m always sure to make sure they know I appreciate them and the sweet things they do.
The other part of that high number is that in the weeks that followed our wedding my only living grandparent passed away. My grandmother was 93 and LOVED by anyone she crossed paths with. This meant our family was showered with flowers, plants, and amazing food in the weeks that followed. Since I had just finished our wedding thank you notes, and my mom was trying to wrap up her estate I volunteered to write most of the notes. I would need notes that would be fitting for both future wedding gifts and notes of thanks from my grieving family. The problem I started running into was how expensive this was starting to become…
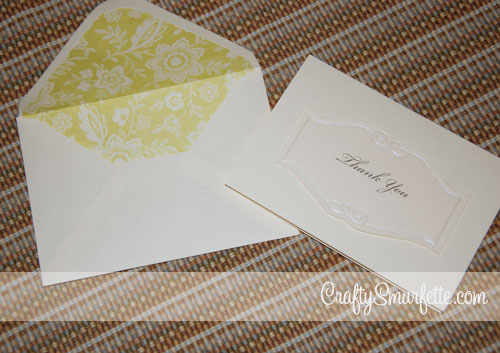
You see, I’m a bit of a paper snob. It has to look right, and more especially FEEL right. I’m that person that closes her eyes and feels paper to make sure it feels “nice” before I can use it. I love nice paper! This meant, I had to do something that was equal parts nice paper & economical. After looking around, I found thank you cards I could buy cheaply that had a nice texture of fabric (really similiar to the PaperSource Luxe), but the envelopes were way to thin for my tastes. To fix this, I decided that they needed to be lined. Enter 40% of coupons for one of my favorite places in the world and a homemade liner template…and what you get is semi-DIY thank you notes that are fitting for most any southern gals needs.
Tools Needed:
– Piece of Stencil Plastic to make liner template
– Black Sharpie Marker
– Scissors
– Scor-Pal (not required just made it easier to do many at once, but a bone folder would be helpful)
Materials Needed:
– White School Glue Stick or Double Sided tape
– Printed Paper for liners (a thinner paper works best, I used thin scrapbook paper or a thicker wrapping paper)
– Brides Thank You Notes from Michael’s
Instructions:
Create your liner template.
I love, love, love lined envelopes. I think they give coorespondance that little extra “something”. In the case of these prepurchased card sets, they also firm up the feeling of the envelope which makes it oh so much better in my eyes. There are quite a few DIY guides out there to how to make envelope liner templates, and I’ve used quite a few of them. This is one of favorite liner template references. The one thing I like to do when I’ll be using a paticular sized liner over and over is to create the template in a bit more strudy fashion to keep the wear and tear to a minimum.
-
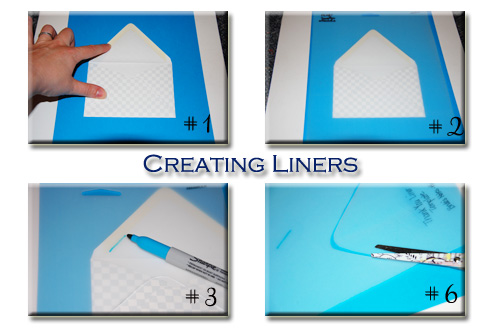
Take one envelope and place it on a firm surface. I used a piece of rolled up post-it note to keep it firmly in place.
- Place the sheet of stencil plastic over the envelope, tape it to your table to help hold it in place if needed.
- Using the Sharpie marker start tracing around the inside of the flap on the inside where the glue-line stops. This will allow the liner to fit right below the sticky part that seals the envelope. Follow the glue line to the outside edge of each envelope.
- Next trace just inside of the bottom edge of the envelope.
- Finally place a ruler to connect the top lines with the bottom line. Move this line just inside the outside edge of the envelope to allow the liner to slide down inside the envelope. Repeat on the other side.
- Cut out the liner and label your template with a sharpie so you’ll have it handy next time you need to line a new envelope of this size.
-
Now, use your liner to cut out the liners from your selected paper. Use a pencil or pen to trace the liner on the back side of the paper. For the most recent set of liners I used thin scrapbook paper from a bulk “My Minds Eye” book of papers. I liked how it had a variety of “vintage” floral prints. For a piece of 12×12 paper you should be able to get 4 liners with a small piece left over that would be a perfect size to reuse as a belly band if you are also DIY’ing your invitations.
-
Once you have traced all the liners cut them out cutting right on top of the lines you traced.
-
Slide the new liner inside the envelope and use your bone folder to score the line where the envelope will fold. (
Optional Tip): If you have a
Scor-Pal (mine came in really handy during the wedding prep) you can set up a scoring template and easily score all your liners really quickly. To do this line up the base of the envelope in the upper corner and mark the correct line on the tray with a post-it note to serve as your template to know where to score each liner.
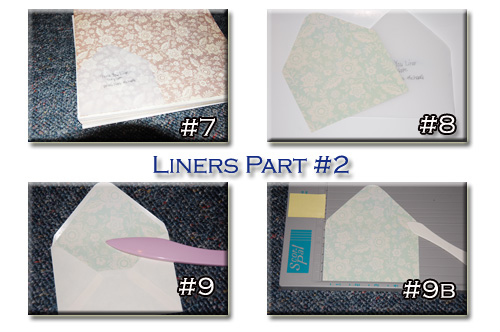
-
Slide the liner into the envelope and using your glue stick or double-sided tape (both work great) and apply glue to the back flap of your liner. Carefully fold the top of the envelope down onto the liner and rub across with your bone folder to ensure it is secured with no air bubbles.
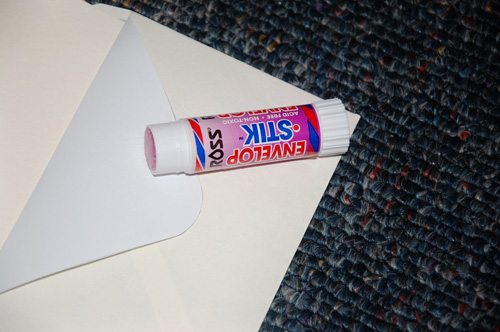
Assemble the note cards.
These cards have a 3-Demensional crest on the front. You will need to carefully remove these from the punch out paper and apply to the center using the double-sided foam squares included in the package. It goes really quickly and I did all 40 during a 30-minute episode on HGTV.
Use your thank you notes 🙂
Cost Breakdown:
Remember my main reason in taking on this quick envelope lining project was it produced cute/vintage looking thank you notes at a more economical price. The whole project for 40 thank you notes took about 2 hours…so lets look at the costs
Brides Thank You Notes (40 ct) – $6.35 (using Michaels 40% off coupon)
My Minds Eye Scrapbook Paper (180 ct) – $10.59 (50% at Hobby Lobby)
Ross Envelope Stick – Already had from shower hosted last year – free
Plaid Stencil Sheet (2 pack) – $6.35 from Hobby Lobby
—————————————–
Divide that out (only counting the paper from the package that I used) and it comes to = $0.38 per note! That’s pretty good I’m thinking! Even with a stamp it still makes them less than $1 per card, and they are pretty cute too! Want to see them one more time? Here ya go:


