DIY: Mother’s Day Napkin Wraps II

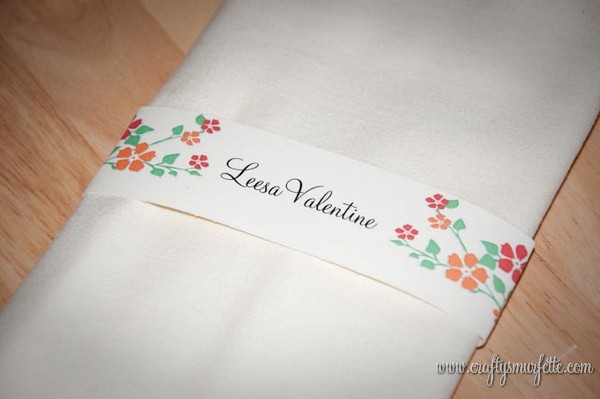
I can’t believe in my haste to finish up all my April Stash Busting projects (which I will begin to post this weekend) I almost forgot to post the second round of Mother’s Day Napkin Wraps!  Hope you enjoy Part II which we’ll call the “Mother’s Day Floral Set”


Click to Download: Pink Roses Napkin Wrap


Click to Download: Pink Daisy Napkin Wrap

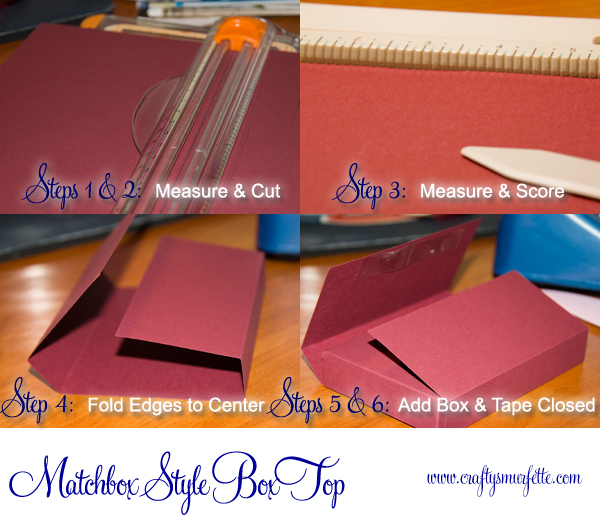
All templates use the Monterey BT font which is free to download from Sofontes.  New to Napkin Wraps?  No worries, visit this post for step-by-step instructions on how to use my napkin wrap templates!What do you have planned for the mothers in your life to celebrate Mother’s Day this year?

DIY: Folding Napkins into a Pocket

This post should kick off the beginning of our wedding DIY recaps. One of the projects I took on for our wedding was dressing up the table just a bit.  It seems that all too often with buffet dinners the tables can get “left out” of the decorating grand plan since it’s not really “necessary”.  I didn’t want to just go with rolled silverware/napkins to be picked up from the food line. Instead I wanted something a bit more formal, yet still in line with our not-so-shabby chic surroundings.  By setting each place setting with the silverware and folded napkin with menu, I think it gave our tables a bit more color and pop…even if my husband did call me crazy for obsessing over it! 😉


Since I’ve already posted our menu template that was created to fit inside a folded napkin, and the paper napkin wraps we used for seating cards, today we’ll go over how to easily fold your napkins into the pocket shape.  I know there are quite a few different methods out there, so I used bits and pieces and ended up with this one working best for me.

Items Needed:

  • Napkins (the ones we used for our wedding were purchased from Ikea)
  • Iron & Ironing Board
  • Something fun to put in the pocket 🙂

Instructions:

  1. For best display iron napkins flat before starting folding process.
  2. Place napkin front (or finished) side down
  3. Carefully fold the top horizontal edge (the one farthest away from you) down about 3/4 the length of the napkin.  Iron top portion of napkin for crisp edge.
  4. Fold the bottom horizontal edge up and over the previous fold.  This will create your pocket and again iron to create crisp fold.  (Hint:  This set controls the depth of the pocket, so simply adjust your fold size for larger/smaller pocket).
  5. Now, flip the whole napkin over so that the pocket it now face down on your ironing board.
  6. Fold each vertical side of the napkin into the middle so that they meet flush and form a square.  Once again press for crisper look.
  7. Finally fold the left side over on-top of the right side and press one final time.
  8. Add menu, favor, or other fun item into the pocket and set your table.

Afterthoughts:

This is where I’ll be honest and forewarn you that ironing and folding 100’s of napkins will take a WHILE.  I did the first 50 by myself over several nights and it seemed to be taking forever to fold, add the menus, & the name card wraps.  Then with the help of two wonderful friends was able to finish the second 50 in a few hours in an assembly line fashion.  If you are doing this for a larger event I HIGHLY recommend the assembly line approach skipping the middle ironing steps and only iron at the beginning to make sure the napkin is flat to start with.  All in all…I’m still really happy with how everything turned out.

If you are following along with our DIY wedding table scape so far we’ve (click for details):

DIY: Mother’s Day Napkin Wraps

I am trying to get a slight bit ahead with posting holiday napkin wraps…my mom would be so please! Speaking of Moms here are a few napkin wraps inspired by the mom’s in my life.  Hope you enjoy Part I which we’ll call the “Mother’s Day Tea Set”

Let’s kick this off with a simple pink background.  This would be great for a Mother’s Day Brunch, Tea Party with the girls, or even a pink wedding.


Click to Download: Pink Background Napkin Wrap Template

And a simple tea kettle that looks fun printed on colored cardstock:


Click to Download: Tea Kettle Napkin Wrap Template

A finally, a pretty china tea-cup!

Click to Download: China Tea Cup Napkin Wrap Template

All templates use the Monterey BT font which is free to download from Sofontes (see link on templates page).  New to Napkin Wraps?  No worries, visit this post for step-by-step instructions on how to use my napkin wrap templates!

What do you have planned for the mothers in your life to celebrate Mother’s Day this year?

DIY: Easter Napkin Wraps – Religious Themed

I have a friend putting together a ladies pre-Easter brunch at her church who asked me if I could put together a couple of reusable religious themed wraps.  So using MSClipArt (I’m being lazy since I’m so swamped at work) I whipped up several options that could be used not only at Easter but for other events later in the year.

Let’s start out with a pastel cross theme:


Download Template:  Pastel Cross Napkin Template

And then my friend requested a black & white option with a bible theme:

Download Religious theme template: Black & White Bible Napkin Template

All templates above use Monterey BT font which is free to download from SoFontes (see link on templates page).  New to Napkin Wraps?  No worries, visit this post for step-by-step instructions on how to use my napkin wrap templates!

DIY: Pink Lily Napkin Wraps

Yesterday a reader sent me an email asking for a template featuring an Easter Lily, and since I am always so excited to hear from someone who reads my little blog I couldn’t turn her down.  So, Becky…this one is for you and thanks so much for your kind words!


To Download Template:  Pink Lily Napkin Wrap Template

All templates above use Monterrey BT font which is free to download from SoFontes(see link on templates page).  New to Napkin Wraps?  No worries, visit this post for step-by-step instructions on how to use my napkin wrap templates!

It’s true what they say about comments being the crack for bloggers…so what say you?  Any suggestions for future templates that you’d love to see?

DIY: Easter Napkin Wraps – Part II

Today we have Easter baskets & banners, as well as a new idea for how to use the napkin wraps.  Lets start out with a cute Easter basket wrap:

To download: Easter Basket Napkin Template

Next up, a cute Easter banner template that can be used as either a standard napkin wrap, OR just cut and lay it across your place-settings as a quick & simple name card.  These would also but cute if cut on the ends to duplicate the banner shape (I just thought of that as I was posting the photos).


Download: Easter Banner Napkin template

All templates use Monterey BT font which is free to download from a link on the templates page.  New to Napkin Wraps?  No worries, visit this post for step-by-step instructions on how to use my napkin wrap templates!

_________________________________________________________________________

In other news, we started the great craft room/office/spare bedroom relocation process.  It will be amazing to have a much brighter, larger space to use for my crafty fun and office but I dread the process since it involves painting and new flooring.  Any suggestions on how to organize all my craft supplies once I’m able to unpack them?

DIY: Easter Napkin Wraps – Part I

I realized this week that Easter is just around the corner.  It seems that this year is just speeding by and I’m left wondering where did the first quarter of 2010 go?  Sadly, the job that pays the bills has been demanding most of my nightly internet time and I missed St. Patrick’s Day completely…but I am determined to whip together a few last-minute Easter decorations this week.  Starting with napkin wraps!

This post is about more casual napkin wraps, with bunnies.  Up next will be a post with Easter baskets & banners.  Later this week I’ll post a few more religious themed wraps I put together for a friend to use at a church event.  It going to be a Napkin Wrap fest this week in the Smurfy household 🙂

Let’s kick this off with the cutest little brown bunny.  He’s so cute I want to hug him 😉


Download template: Brown Bunny Napkin Wrap Template

And a more vintage looking bunny:

Download: Vintage Bunny Wrap Template

A finally, a parade of bunnies!

Download: Bunny Parade Wrap Template

All templates use the Monterey BT font which is free to download from Sofontes (see link on templates page).  New to Napkin Wraps?  No worries, visit this post for step-by-step instructions on how to use my napkin wrap templates!

DIY: Large Matchbox Candy Boxes

Yesterday I showed off a few of the candy box Valentines I handed out this year.  I think they turned out far better than I expected and I have a few ideas up my sleeve for ways to use them in the future.  Today…I’ll go through how to make your own!  Warning:  this is a photo heavy post because I think it makes it a bit easier to follow along with the process.

Tools Needed:

  • Cutting Device of Choice (Scissors work great, and I used a cutting board and craft knife)
  • Ruler
  • Bone Folder or Scoring Pad (I used my new Martha Scoring board look for a review coming soon).

Supplies Needed:

Instructions:
Creating the Box Bottom (instructions below photo)

  1. Print out the template for the box bottom and cut it out with scissors.  If you plan to make several boxes it might be easier to go ahead and trace the template on a sheet of stencil plastic before cutting it out so you have a sturdier template.
  2. Lay the box bottom template down on the long edge of your sheet of paper and align it to the left or right edge to decrease the number of cuts you’ll make later.
  3. Cut out your box bottom along the blue lines on the template (this will be the outside edges and then an extra inside cut on each side to create the side flaps.
  4. Now it’s time to score the sides.  Using your template’s green lines faintly mark the lines to be scored on the inside of your box bottom.
  5. Carefully score the box from the inside (this only matters if your paper is different on the flip side) using a bone folder or scoring board.  I typically use a ScorPal, but picked up the new Martha one at Michael’s recently and decided to give it a spin).
  6. Now it’s time to fold! Turn your box so that it is laying horizontally on your table, and start by folding the left and ride sides down.  Feel free to add a piece of double-sided tape inside the center of the fold if you want to make the box a bit more sturdy.
  7. Now on the same pieces fold the sides to create the flaps (these will be created by the internal cuts you made earlier).
  8. Fold the outside edge of both horizontal sides of the box toward the center (do not tape).  Repeat by folding it over again towards the center (again not taping).
  9. Open up the folds, and place a piece of double-sided tape on the inside of the outside fold, and make sure that the side flaps are “down”.  The left and right sides of the box should form a bracket shape on both sides.
  10. Carefully fold the horizontal side of the box flap over the flaps and press down on the inside of the box to seal the tape.
  11. Repeat for other side of the box… and you are finished with the box bottom!

Creating the Box Top (instructions below photo):

  1. This is the easy part, no template required (but feel free to make one if it makes it easier on you)!  Take out the sheet of paper leftover from cutting out the box bottom.
  2. Using the 8.5 inch edge you didn’t cut from before measure up 4 3/8 inches and cut straight across creating a rectangle that is 4 3/8 inches by 8.5 inches.
  3. Lay the paper out horizontally and again using your ruler & scoring tool score the rectangle from top to bottom vertically in the following increments (from left to right).  This is where the Martha score board was a wonderful addition, I didn’t have to mark out the scores since the ruler is built right in!  Note:  All measurements are in inches and measured from left to right from the edge of the page.
    1. 2 inches
    2. 2 3/4 inches
    3. 5 3/4 inches
    4. 6 1/2 inches
  4. Carefully fold all scores upwards toward the center of the page.
  5. Insert the box bottom with the open side down
  6. Carefully fold top around the bottom and secure with a piece of double-sided tape.
  7. You now have a box perfectly sized to hold 8 Hershey’s Nuggets (or a gift card perhaps).

(Click here to see more Valentines Boxes)

Now…how will YOU decorate your candy box?

Weddingbee Valentines Swap 2010

Last year the day before Valentines I saw this adorable template for making a larger matchbox style paper box with matching candy wrappers to fill up the inside with.  I quickly downloaded it, printed it out…and hit a roadblock.  No matter what I did with the settings it was either too small or too large and I deleted it and gave up.  (sidebar:  I honestly don’t remember where I found it last year since I didn’t save it and I’m also quite positive the problems were with our old printer).  So this year I wanted to do something similar to send my swap partners for the WB Valentine’s Swap…so I sat down with some scrap paper, a ruler, and a pencil.  It took an hour or so…but I ended up with a box template that would hold 8 Hershey’s nuggets.  

I went to work decorating the boxes and their chocolate cargo…and I think they turned out quite cute!  Each includes a Shrinkey Dink magnet on the front with a familiar little bee for them to keep to remember their fun ‘bee times with for years to come.  I hope they like them half as much as I enjoyed making them! 🙂

PS.  I’ll be posting the templates & instructions for how to make your own matchbox style boxes later tonight 🙂

DIY: Valentine Themed Napkin Wraps

It’s that time of the year again…Valentines Day is approaching.  Want to know a secret? shh..but up until the past few years I have avoided Valentines Day like the plague.  I have valid reasons….bad things happen to me on that day.  For example one year I managed to knock myself out while attempting to pick up an earring back.  However, I have a man who was determined to at least make me acknowledge the date, so here we are.  Two years later…and I’m making Valentines Day crafts! So you should thank my Brainy hubby for the cuteness you see below 🙂

Take a closer look… isn’t this little birdy I found in good ‘ole MSClipArt just adorable?

Click to download template:  csmurfnap_valbird

New to Napkin Wraps?  No worries, visit this post for step-by-step instructions on how to use my napkin wrap templates!

So, what about you?  What crafty fun do you have in store for Valentines Day? or is it possible anyone else out there has Valentines Day horror stories to share? 😉