DIY: Race Car Cupcake Toppers

I don’t know about you, but there is at least one person in my house who is a fan of all types of motor car racing.  From F1 (which I actually enjoy watching) to NASCAR he is interested in it all.  I blame his dad and grandfather for this fascination with all things racing but I suspect it is quite the norm with boys of all ages.  I recently had a custom request to put together something for a little guy’s 3rd birthday party.  Mom wanted a race theme but nothing “character” related and I lucked out and found these adorable car stickers on the cheap.  I think they turned out quite fun, and wanted to share in case you might want to make a few of your own!

Race Car Cupcake Toppers by Dill Pickle Picnic

DPPPhoto-096Supplies Needed:

  • Race Car Stickers – 2 stickers per topper (these cute 3D ones came from Dollar Tree)
  • Toothpicks
  • Optional: glue (low temp hot glue or craft glue)

Instructions:

  1. Place first sticker laying face down on a flat surface
  2. Place toothpick near the bottom of the sticker, making sure to leave .25 inch or so of the toothpick on the sticker’s surface.
    DPPPhoto-098
  3. Optional Step in case your stickers are a bit heavier:  Apply glue to the back of the sticker
  4. Carefully place the second sticker over the back of the first pressing firmly to “lock” the toothpick in place.
    DPPPhoto-099
  5. Let dry completely and enjoy!

Race Car Cupcake Toppers by Dill Pickle Picnic

If you don’t want to make your own…I got a bit carried away so I have one additional set listed in my Etsy shop.

DIY: Cute as Button Shirt

So, let the April Stash Bust posts resume (Yes, I realize it’s now May).  Mid-April I had the perfect weekend to get a few stash busting projects finished up since the hubby was at his dad’s to attend the first Indy Car Race in Alabama.  Racing just isn’t my thing so I opted to stay home and tackle our weed filled flower beds instead.  So, Saturday after spending the majority of the day working in the yard and finding out my credit card number had been stolen, I retired to my little craft room to see what I could whip up.

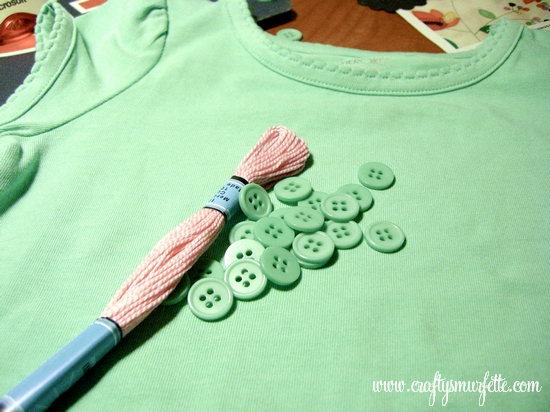
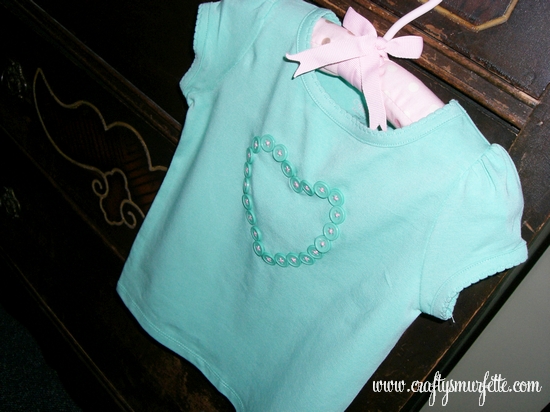
I had originally purchased this aqua t-shirt with the intentions of making my niece a bunny shirt for Easter.  Since that didn’t happen, I decided I needed to do something quick with the shirt so I could include it in a package I was planning to mail my sister that day.  So I started digging around in a couple of the plastic bins of craft supplies I have stashed in a closet and came up with some leftover buttons from a wedding project and a massive stack of embroidery floss.  Put all that together…and you get this Cute as a Button Heart Shirt.

It was super fast to make and turned out much better than I’d imagined.  I like that it looks like a more expensive boutique shirt, yet cost me right around $5.99 to make.

To make your own version you’ll need the following:

  • T-Shirt
  • Buttons (I used (25) 1 cm buttons for this project)
  • embroidery floss
  • needle
  • pencil to draw outline
  • heart shaped template (optional)
  • embroidery hoop (optional)
  • hot glue/fabric glue (optional)

Instructions:

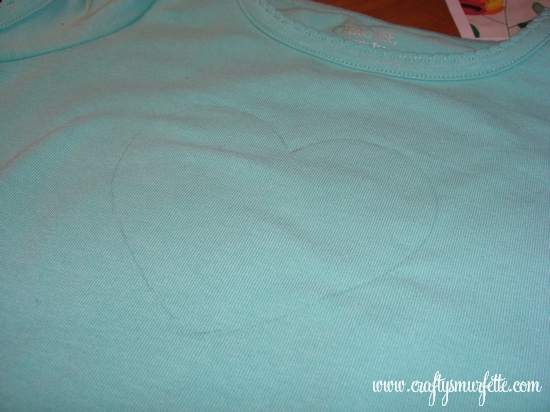
  1. Press the shirt flat
  2. Create Heart template and copy outline to shirt.  I used a regular pencil but a tracing pencil that washes away would have worked better if I’d had one.
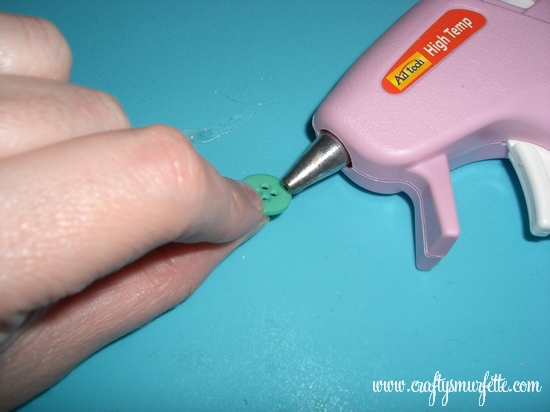
  3. If you want to add a little bit of extra attachment of the buttons to the shirt, take a moment to glue the edges of the buttons to the shirt.  Take care not to glue the centers so you can stitch them down in the next step.
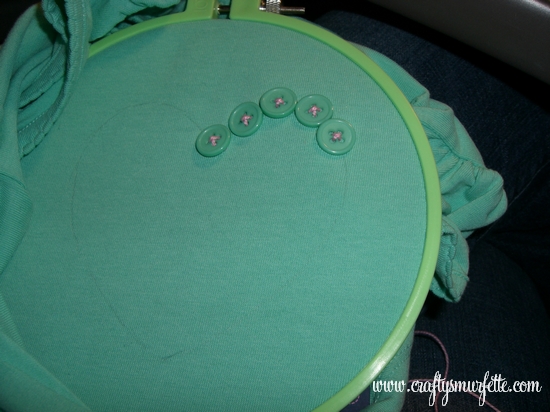
  4. Thread your needle with embroidery thread and tie off with a sturdy knot.
  5. Start in the center of the heart and stitch your buttons to the shirt with moving around the heart.  This is where an embroidery hoop might make the process much easier.
  6. And after about an hour….1 cute as a button heart shirt :

Oh…so about those cute pink shorts.  I have to admit I bought those Saturday on a trip to Target during April.  I know…I wasn’t supposed to be adding to the stash before I finish busting through it but if it was less than $1 does it count?  My local store had all their Easter goodies marked 75% off, but a nice lady watching me pick up a bag of Dove eggs told me it was actually ringing up 90% off.  Which included all their children’s Easter themed clothing.  So the shorts cost me a whopping $0.43 (including tax) and then I sewed a matching button in the middle of each of those cute little bows on the sides just to tie it all together.

Project Costs:
– TShirt –  from stash – otherwise Target – $5.00
– Buttons – free from stash – otherwise $1.99 for package, using 1/4 of package
– Embroidery Floss – free from stash – otherwise $0.99
GRAND TOTAL:  $7.98 if you needed to buy everything at once.
My Grand Total:  FREE from STASH (ok…$0.43 for the Easter Clearance shorts)

_________________________________________________________________________

Safety Note:   Make sure all buttons are glued and then sewn on securely.  Due to buttons, do not leave your baby unattended while wearing this garment.
_________________________________________________________________________

ReUse: TP Roll Candy Bunting

In honor of Earth Day & my April Stash Bust endeavors I decided to try my luck at reusing several TP(toilet paper) rolls because I’m not sure about your household but we seem to have an abundance of empty cardboard rolls.  I’m really loving bunting right now, so I set out to make some sweet candy bunting from my trash & stash…and this is what I ended up with:


What do you think?  I’m thinking it’s quite cute…and so easy to make that you could even have you kids help you with this project.  It could be fun for a child’s birthday party or even dressed up a bit more to hang behind a candy buffet.

Supplies Needed:

  • Toilet or Paper Towel cardboard rolls (1 TP roll averages 9 pieces of candy, or 4 feet)
  • Tissue Paper (you could also use fabric)
  • Curling Ribbon
  • Twine (Ribbon or Yarn would also work)
  • Hole Punch
  • Rickrack Scissors
  • Craft Knife or Scissors
  • Double-Sided Tape (optional)

Instructions:

  1. Using your craft knife or scissors carefully cut your cardboard rolls into 1/2 inch pieces.  (If you are doing this project with small children this is a step an adult should complete ahead of time.)
  2. Using a standard hand-held hole punch punch two holes across the tube from each other.  Repeat this process for each of your 1/2 inch pieces.
  3. Cut bunting twine to your desired finished length.
  4. Cut your tissue paper (or fabric) into 5 inch square pieces using pinking sheers. (If doing this project with children this is another step that could be completed by an adult ahead of time.)
  5. Carefully thread one piece of cardboard onto the twine. (hint: To make this easier I actually taped one end of the twine to my table.  This helped keep one end stationary while I was threading from the opposite end.)
  6. Take a piece of tissue paper and place it under your threaded circle and fold it over to overlap in the front.  (hint:  You might find using a small piece of double-sided tape helpful to hold everything in place, but it isn’t necessary.)
  7. Using 4 inch pieces of curling ribbon, tie off each side of your “candy” with a hard knot.
  8. Using scissors curl the ribbons to make a decorative tie.  (If you are doing this project with small children this is a step an adult should complete once the stringing process is completed.)
  9. Repeat the length of your twine.
  10. You can move the pieces slightly along the finished product to help evenly space them.
  11. Hang and Enjoy!


See…quick, easy, and a fun way to turn a common household trash item into something fun & decorative!

And if you have extra “pieces of candy” left over you could always glue them to place cards or signage for a sweet look.

Price Breakdown: Free from my trash & craft stash!
However, if you wanted to create these with no supplies on hand you could do so entirely from your local dollar store!

What crafty fun will you reuse trash & stash items for this week?


DIY: Sweet Race Car Onesie

I have this “thing” where I feel like I need to make a little something for each and every baby/bridal shower I attend.  It’s a compulsion of sorts and often I stress myself out coming up with the perfect little handmade treat to go with the gift purchased off the registry.  With 4 people around me having babies and a few weddings thrown in you can see where I might have my hands full.  However, the gift below was not only the easiest to construct and economical, it was also the easiest to come up with.

You see my friend’s husband drives a race car in one of the local circuits.  He already has big dreams of his sweet little girl being the next female racing star, so it just stood to reason that she would need the proper attire even at her young age to support her favorite race team!  Granted here in the south there is a huge supply of NASCAR baby racing gear so I could have bought something commercially, but I thought she needed something a little more “sugar & spice” to mix with “my daddy rocks”.

Materials Needed:

  • Cotton Onesie
  • Fabric for car & numbers (non-raveling since there will be exposed edges)
  • Matching embroidery thread
  • 2 Large Buttons
  • Heat Tape

Supplies Needed:

  • Needle
  • Scissors
  • Template
  • Pencil or Pen
  • Iron

Instructions (text below pictorial):

  1. Remove all stickers and tags from onesie and press flat with iron.
  2. Print out your race car and number templates.  (I used a stock image from MS Clip Art and re-sized it to fit a smaller onesie)
  3. Cut out your race car shape.
  4. Trace template outline onto backside of fabric (I used a regular pen, however a fabric marking pen/pencil would be a better option).
  5. Use scissors to cut out along traced guidelines
  6. Repeat steps 3, 4, and 5  to create race car numbers
  7. Using embroidery thread  sew the numbers to the car.  I used a straight embroidery stitch and stitched down the center of each number.  You could also do this step with your sewing machine if you prefer.
  8. To help hold the car in place while you stitch place one small piece of Heat Tape down the center of the car and press onto the onesie.
  9. Now that the car is stead place the steering wheel under the edge of the car fabric and using the same method as in Step 7 sew it to the onesie.
  10. Switching embroidery thread to match the body of the car, use a blanket or edge stitch and sew along the car’s edge, attaching it to the onesie.
  11. Attach your button wheels to the car also with embroidery thread, careful to tie off all knots/etc. under the buttons or car to keep “itchy stitches” away from baby.

Cost Breakdown:

  • Onesie – Garanimals brand from Wal-Mart – $3.81
  • Embroidery Floss – Had on Hand from multipack purchase 2+ years ago
  • Pink  Felt – $0.26
  • White Felt – Had on Hand
  • Buttons – 4 Pack from Dollar Tree/used 2 – $0.53
  • Heat Tape – Had on Hand
  • Grand Total:  $4.60

_________________________________________________________________________

Safety Note:   Make sure all buttons are sewn on securely.  Due to buttons, do not leave your baby unattended while wearing this garment.

_________________________________________________________________________

What about you…anyone else have my same “I must make them something compulsions”?  And if so, please share some of your favorite DIY baby gifts…

ReUse – Powdered Drink Container Candle

I have a friend with a growing 5-year-old…one who decided she wanted some big girl candles for her room.  Obviously candles aren’t the best solution for a 5 year old, and battery operated candles are quite pricey for something that might lose its appeal quite quickly.  So I had an idea:  use some leftover battery operated tea lights to whip her up some cheaper “big girl” candles 🙂

Materials:

  • Plastic Powdered Drink tubes (ex. Crystal Light)
  • Battery Operated Tea Light (1 per plastic tube)
  • Scrapbook Paper
  • Double-Sided tape or Xyron Machine
  • Scissors or Paper Cutter

Directions:

  1. Start out by cleaning the plastic container and removing all labels.  Dry throughly afterwards.
  2. Measure the height of your plastic container.
  3. Using your scissors or paper-cutter cut a piece of scrapbook paper to the correct height.
  4. Wrap paper around your container and make a small mark where the edges meet (adding .25 inch to allow for a better seal/overlap).
  5. Using your scissors or paper-cutter cut the piece of scrapbook paper to the correct width.  Use this piece as a template to cut other pieces for more containers.
  6. If using an Xyron machine run your pieces of cut scrapbook paper through the machine.
  7. Carefully remove the backing from the paper and carefully wrap it around the plastic container, taking care to smooth out to prevent any air bubbles. (If using double-sided tape run a piece down the height of the container and attach one end of the paper.  Then attach another piece of double-sided tape to the inside of the finishing edge and carefully smooth around so that the paper is smooth and the edges are sealed).
  8. Drop in 1 or 2 battery operated votives and display your “big girl candles”. 🙂

Cost Breakdown:

  • Plastic Powdered Beverage Containers – Free from recycle bin
  • Scrapbook Paper – Free (or $1 from Target Dollar section)
  • Battery Operated Tea Lights – Free, leftover from wedding (or $1 for 2 at Dollar Tree)

Total:  FREE (or $1.50)

Bonus:  These are so easy to make they would make a fun crafty project for the kiddos as well!