Reuse, Recycle: Leaf Seating & Food Labels

Yesterday I left you with a bit of a teaser for today’s project which also uses leftover food box cardboard.   Each year my office has a Thanksgiving lunch, and each year there is always a bit of question as to what each dish on the line is.  So, today we’ll use the scraps leftover from the banner project to make buffet labels or you could use them for seating cards as well.

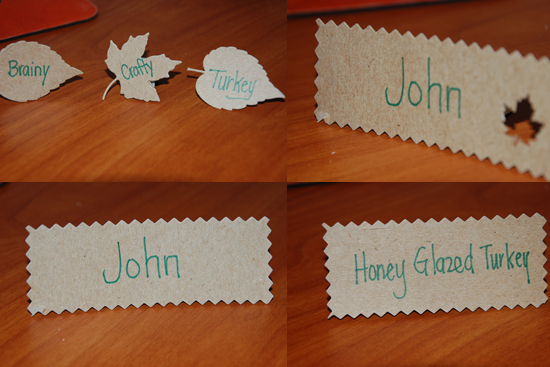
Today we’ll turn those leftover cardboard box scraps into this:

Materials:
– card board scraps leftover from banner project
– marker (for lettering)
– scotch tape, school glue, or hot glue

Tools:
– Cuttlebug (or edge punch, or scrapbooking scissors)
– Cuttlebug Leaves Dies (or edge punch, or scrapbooking scissors)
– Scissors
– Shape punches (optional)

Instructions:

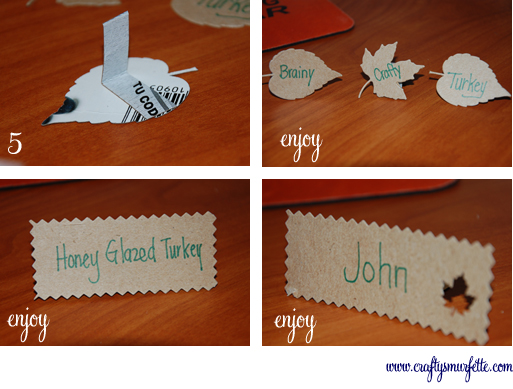
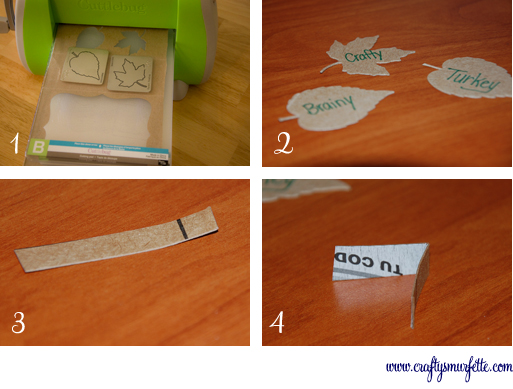
  1. Carefully stack the leaves dies and the card board and run through the die cutting machine (careful to use acrylic plates as indicated by each machine’s instructions).  Repeat as many times as necessary to cut enough leaves for each of your dishes or place settings.
    Note:  Don’t worry if you don’t have a Cuttlebug, or the leaves dies. You can get an equally fun look by marking off rectangular pieces and cutting out with scrapbook scissors OR also from cutting out with regular scissors and then using an edge punch.
  2. Using your black marker write on the dish names or person’s name for place cards.
  3. For leaf dies cut a small 1.5 x .25 inch piece of leftover cardboard for each leaf. 
  4. Fold each of these pieces in half vertically. 
  5. Use your scotch tape (school glue & hot glue would work well also) to attach the folded piece to the back of each of the leaves.
  6. Place & Enjoy!!
 

New Product – Devine Twine is HERE!

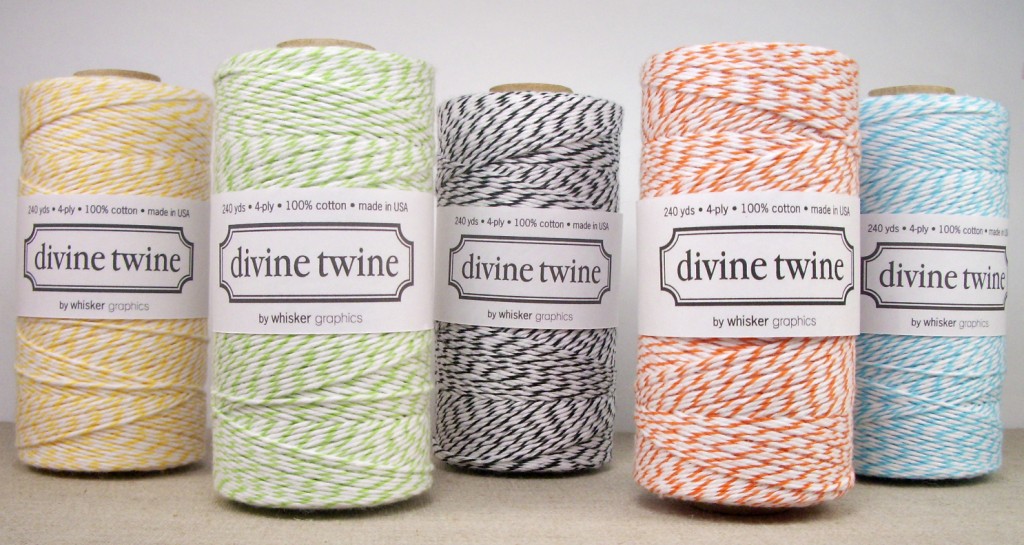
If you aren’t already familiar with Whitney at Whisker Graphics you are already missing out…but as of today she is my hero because she brought new colors of bakers twine to the masses.  I’m seeing the apple green working well with many things in my future!!

(source: Devine Twine)

Click the photo above to check it out and order yours!

**Note: I am in no way affiliated with or receive nothing in return for this post.  It is based purely on my own opinions!”

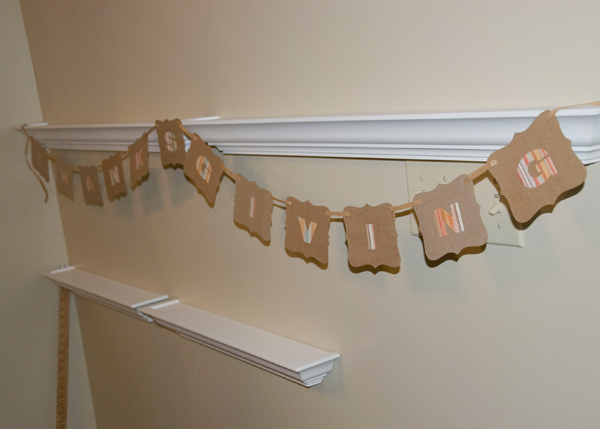
Reuse, Recycle – Thanksgiving Banner

If you are anything like us, you throw away several “chip board” style boxes every week, between cereal, granola bars, and yogurt packs it adds up.  Now, if you are anything like ME, then you love using chip board & kraft paper for your crafting projects…do you see where I’m going with this? 

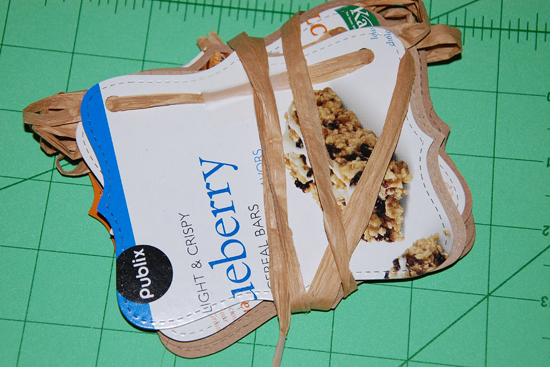
For projects that are one-sided, why not reuse something that you would just be throwing away (hopefully in the recycle bin)?  So stick around and I’ll show you how to turn these:

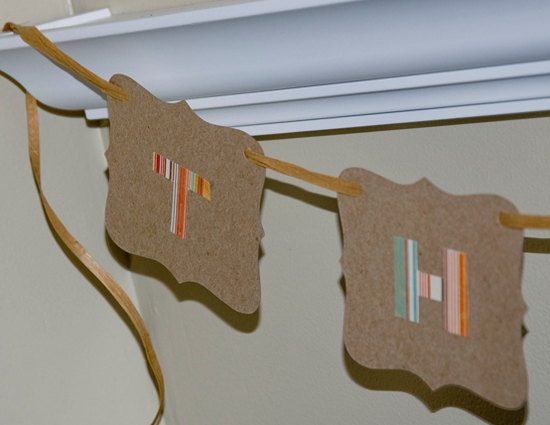
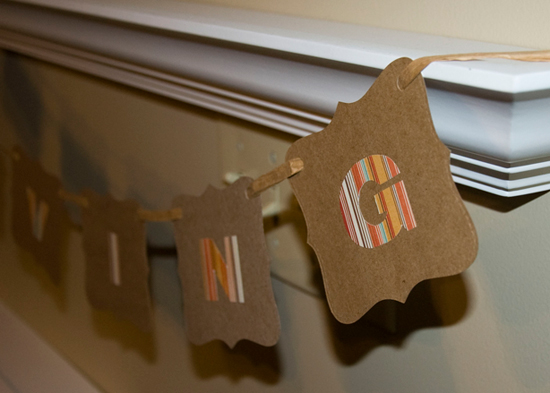
Into this:

Materials:
– card board boxes destined for the trash
– scrapbook paper to make letters
– 3 yards of raffia (twine, ribbon, or yarn… use what you have)
– tape

Tools:
– Cuttlebug (or edge punch, or scrapbooking scissors)
Top Note Die from Stampin Up
– Standard Hole Punch
– Glue Stick, School Glue, or Xyron (again use what you have)
– Scissors
– Bone Folder

Instructions:

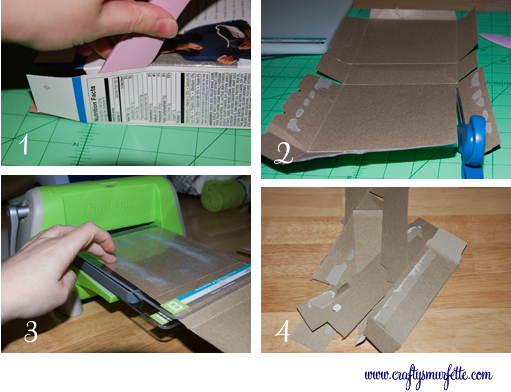
  1. Carefully pull apart glued seams on each of the cardboard boxes.  I use a bone folder to help open up the more difficult areas.
  2. Using scissors cut off all side flaps from both sides of each box.  For larger (cereal sized) boxes you will also need to cut the larger areas into small pieces that will fit through your Cuttlebug or Bigz machine.
  3. Carefully stack the Top Note die and the card board and run through the die cutting machine (careful to use acrylic plates as indicated by each machine’s instructions).  Repeat as many times as necessary to cut 6, 12 or 18 (depending on your selected message). 
    Note:  Don’t worry if you don’t have a Cuttlebug, or the Top Note Die. You can get an equally fun look by marking off rectangular pieces and cutting out with scrapbook scissors OR also from cutting out with regular scissors and then using an edge punch.
  4. Put leftover cardboard aside for tomorrow’s project 🙂
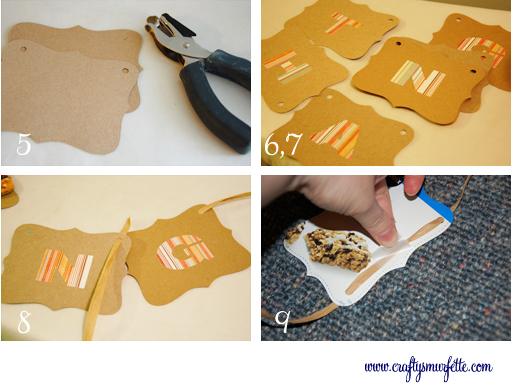
  5. Use hole punch to carefully punch the top area of each piece and set aside
  6. Using your scrapbook paper carefully cut out the letters for your desired message.  I like using 2 inch sized letters.  If you have letter dies you could use them to easily punch out your letters, you could also use stickers or pre-cut chip board letters.  OR you can always use old school stencils to trace letters in reverse on the back of your scrapbook paper and cut them out with scissors (that’s what I did) 🙂
  7. Use your glue product to attach letters to card board pieces.
  8. String your card board pieces with the raffia.  To be consistent I always start from the front of each piece of card board, so that the raffia piece is behind the shape. 
  9. To help keep my pieces in place I use a bit of tape on the back of each piece to keep them from sliding.
  10. Hang & Enjoy!!


Another really fun feature to this quick & cheap project is that it folds up to store really easily, so we can use it again next year! 

Price Breakdown:
Since I used boxes that were going to be thrown away, and other materials I already had literally lying around my craft table…it was FREE!!!! 

And did you notice a hint for tomorrow’s crafty post in the photos above?  Yep, check back tomorrow for another reuse project.

DIY – Shoe & Boot Bags for a Buck

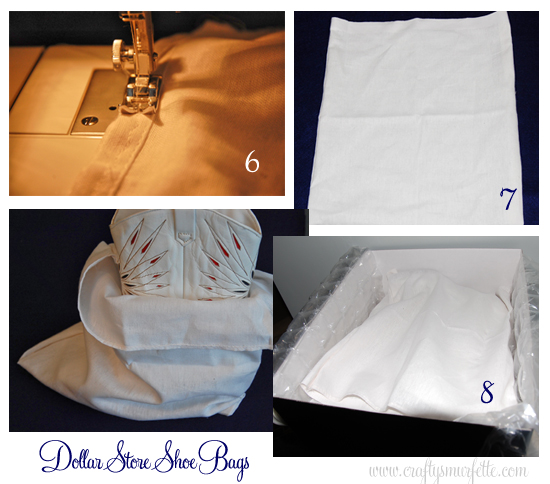
A few weeks ago I opened a small etsy shop in an effort to help sell some of  my MIL’s clothing from the late 70’s & 80’s for her husband.  I started with 3 items that were easily posted just to see how well they’d do…and last week I sold my first item (cowboy boots).  It was really exciting (for both my step-FIL and I).   As I prepared to ship the boots to their new owner I realized that they needed to be wrapped to prevent the soles from scuffing the white leather, which made me realize that wasn’t necessarily just a shipping issue.  I started looking around the craft room for something stronger than tissue paper that would survive shipping and saw a couple of Flour Sack dish clothes from the local dollar store that I’d picked up to cut into templates for a quilting project currently running around in my head.  They were perfect, and with scissors and a sewing machine I had two dust bags in less than 10 minutes.   10 minutes + $1 = Winner!

Materials Needed:
– Flour Sack Dish Cloth from Dollar Store (1 per 2 or 3 bags depending on size)

Tools Needed:
– Sewing Machine with matching thread
– Scissors

Instructions:

  1. Measure shoes or boots to determine how large your bag(s) need to be.
  2. Remove tags and open dish cloth flat.
  3. Fold dish cloth in half horizontally with unfinished edges to the outside.
  4. Using measurements determine how many bags can be made from one cloth.  For this example of women’s cowboy boots we can make two bags.
  5. Using scissors or a rotary blade cut the cloth into desired widths.
  6. Align open sides of the cloth (pin in place if needed) and sew along the edges.  Repeat on other open side.
  7. Turn bag right-side out
  8. Insert boots and store for use (or shipping)

bootbags_003

For a more finished product you could also turn down the top edge including a draw string.  I plan to make several more of these for several handbags and seasonal shoes so they won’t get dusty between uses.  I also think I will attach leftover tags to identify what is in each bag.

Price Breakdown for 2 boot bags:
$1.06
(tax included)  – You just can’t beat that 🙂

Semi-DIY: Halloween Lanterns

While Halloween typically isn’t a big holiday in the Smurfy household, this year will be a little bit different.  We’ve been recruited by a family member to help out at their historic district home since they have over 200 kids visit, and to bring any decorations we might have.  Since we didn’t have decorations other than some orange string lights (from football season), I decided to try to whip a few up.  I think these little guys turned out quite well, and really like that I can use them again!

Supplies Needed:

  • paper lanterns
  • battery operated tea lights (1 or 2 per lantern)
  • black construction paper
  • glue stick
  • double sided tape or white glue

Tools Needed:

Pumpkin Lanterns:

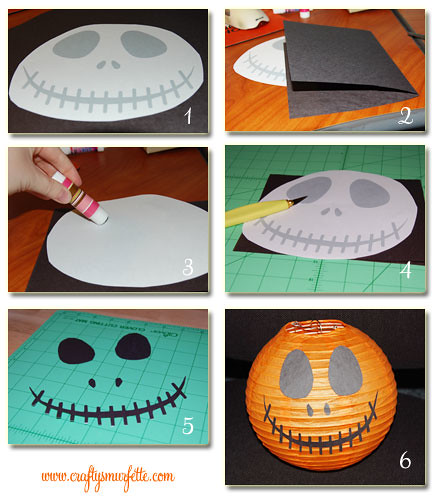
  1. Print out your jack-o-lantern template, careful to trim around as much as possible.
  2. Fold construction paper in half so you can cut two faces at once.
  3. Use a washable glue stick in a few places on the back of the template to help hold it in place while you cut.
  4. Carefully cut out your  face with a craft knife and carefully separate the pieces from the template. (Hint: Save the cut-out templates and left over black paper and use this for carving your real jack-o-lanterns!)
  5. Using double sided tape or white school glue attach your face to the assembled lantern.
  6. Add battery operated tea lights.  I usually drop the tea lights in a sandwich bag and just drop them into the lantern.  The sandwich bag keeps it from falling out the bottom.  If you want them brighter you can always use 2 tea lights per lantern.
  7. Hang and enjoy!!

Ghost Lanterns:

  1. Print out your ghost template, careful to trim around as much as possible.
  2. Fold construction paper in half so you can cut two faces at once.  In this case since I wanted to cut out three, I added an additional piece in the middle of the stack.
  3. Use a washable glue stick in a few places on the back of the template to help hold it in place while you cut.
  4. Carefully cut out your jack-o-lantern face with a craft knife and carefully separate the pieces from the template.
  5. Using double sided tape or white school glue attach your face to the assembled lantern.
  6. Add battery operated tea lights.  I usually drop the tea lights in a sandwich bag and just drop them into the lantern.  The sandwich bag keeps it from falling out the bottom.  If you want them brighter you can always use 2 tea lights per lantern.
  7. Hang and enjoy!!

Reuse Information:
The great thing about using double-sided tape is that I am able to simply pop the cutouts off the lantern when we take them down (carefully as to not rip the paper lantern itself).  This means I can take the lanterns apart and store them to use again next year or use the plain orange & white lanterns for another party.

Cost Breakdown:
We already had most of the tools necessary for this quick Halloween decoration, so I just needed to pick up a couple of supplies.  I only made two stops, Michael’s where I had a 20% entire purchase coupon and the local dollar store, Dollar Tree.  If you don’t already have construction paper and glue you can easily pick those up at the Dollar Tree as well.  I refer to my local dollar store as my “small craft store”.

White Lanterns: $1.00 each with 40% total purchase coupon at Michael’s
Orange Lanterns:  $1.50 each minus 40%  fall decor sale at Michael’s
Battery Operated Tea Lights:  $1.00 for package of 2 at Dollar Tree
————————————————————————————————–
Total for 6 Lanterns (including tax):  $8.02 or $1.33 each

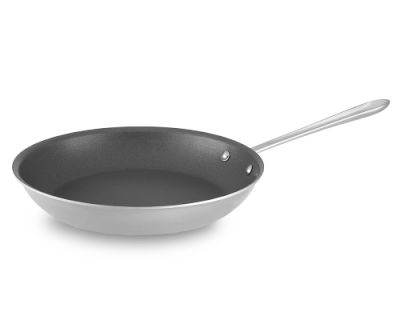
Registry Review: All-Clad Nonstick Fry Pan

If I’m totally honest here the hubs received the 14 inch All-Clad Nonstick Fry Pan for Christmas a year before our wedding.  At first I was a sceptic, after all I had a really nice brand name nonstick skillet that worked quite well, so why would I want to use this over-priced piece of equipment.  I was afraid I’d “hurt” it in some way and he’d be upset.  Plus, it was heavier than mine, and bigger, and took up the space of two stove eyes on our oddly spaced stove top. 

All-Clad Nonstick fry pan

 (Source: Williams-Sonoma)

Then a friend handed me a recipe for picadillo that would be a bit much for my trusty skillet, so I timidly took out the “big pan” as I call it.  And guess what?  It rocked!!  No oil or no cooking spray necessary…because nothing sticks!  The other really “cool” feature is that the stainless handle doesn’t heat up.  So I can grab the handle after finishing sauteing onions and dump them straight into a mixing bowl for the next stage of prep.  Now I just have to remember that our pots aren’t the same way or I’ll end up with a burned hand!

What about cleanup you ask?  Well, that too was a breeze (even though it isn’t dishwasher friendly) because nothing sticks it easily washes clean.  I have NEVER needed to use any sort of “elbow grease” to get anything out of it.  Needless to say I was sold, enough that I gave my parents my 2 brand name skillets (they were still using some enamel-ware from the 70’s) and embraced the All-Clad Nonstick Fry Pan in all it’s “big pan” goodness.  I embraced it so much that we registered for an 8 inch “little pan” that we love for smaller jobs (plus it fits on our weird stove eyes a little better).

Total Score:  5 Mushrooms

**Note** I do not work for nor do I receive any support or benefit from my recommendation of any products or corporations.  These are purely my options based on my experiences with these products and corporations.

Semi-DIY: Embellished Vendor Apron – Reveal

A few weeks ago I posted a link to help with making 3D fabric flowers, with the following teaser photo:

And now that the finished product has made its way to the lovely vendor recipient, I can show you the finished product.  First, a little back story:

For our June wedding I was sure I needed or even wanted a DOC (day-of-coordinator).  I plan things fairly regularly for work, so really this shouldn’t have been any different.  Only…it was!  In addition to the wedding planning I was also in the middle of some serious work-place drama and stress.  Due to family situations that just went from bad to unimaginable my boss stepped back for several months , leaving me & our assistant to “hold down the fort”.  I thought I was managing everything quite well…until a discussion over table linens left me a sobbing mess, standing in Ikea, on Valentines Day.  It was that day Brainy and I agreed I needed help.  We worked to find vendors to scale back my DIY efforts and he took over several areas of wedding planning (Honeymoon & Music to name a couple).  One of those vendors was our florist.  Since we were getting married in such a small town I was really, really worried about the florist in particular.  I grew up in a small town, and had never had a great floral experience with anyone there.  Everyone we asked recommended her, and it was often just assumed that brides there hired her to be their DOC as well.  After our first meeting I was sold on her as the florist, but not sure I needed a DOC.  Then Brainy reminded me of Ikea and said for the low cost it would be fine….and you know what?  It was more than “fine”.  She rocked!  Honestly, I still feel like we didn’t pay her enough, and the best thing was she didn’t seem like a vendor.  Instead, she felt like a long lost family friend and everyone that met her at the wedding raved about how sweet and helpful she was.  So, I decided I wanted to “create” her a small token of appreciation (in addition to rave reviews) but I wasn’t sure what.  One afternoon I remembered a funny conversation we had during the days leading up to the wedding and it hit me, she needed a frilly apron. 

So, using some leftover fabric she had painstakingly decorated our cake table with and a few other items, I whipped up a functional frilly apron to keep her clothes all clean when she is working on her floral goodness.  Since I haven’t sewn in a few years (at least), I was super happy with how it turned out.

Remember those 3D Flowers?  I created 3 different matching flowers and attached half of a snap to the back of each one, then sewed the back half of one of the snaps to the top of the apron.  So she can change them out, and easily remove it for laundering.  Notice how the frills didn’t cover the whole apron?  That way she isn’t wiping her hands on the ruffles.  And yes, I hand embroidered the shop name on the top. 

I’m hoping she loves it almost as much as I loved having her keeping our wedding in line!  Let me know if you are interested in a tutorial for this project and I’ll put one together and post.

Rock the Vote: I Love SW Photo Contest

So this is the post where  I shamelessly ask for your votes!  I just realized I am one of the finalists for the I Love SW photo content on Southern Wedding’s blog….and right now I have no votes 🙁  To show me some internet lovin, click on the link below and leave a comment with which photo you like best!

http://www.swsmag.net/blog/2009/9/29/photo-contest-finalists-i-love-sw.html

CraftySmurfette

PS. Stick around a few weeks and I’ll show you what those cute little guys were left over from 😉